

INTRODUCTION
Chorus Pro offers two connecting modes to the structures issuing and receiving invoices :
- EDI ( Electronic Data Interchange)
- API (Applicative Programing Interface)
These services facilitate the submission, the retrieval and the processing of invoices. Their activation requires a connection between the financial information system of these structures and Chorus Pro.
A "EDI and API connections" dedicated area is available on the Chorus Pro portal. It allows an automatic connection request to Chorus Pro.
SCOPE AND PREREQUISITES
The connection to Chorus Pro is done in two stages :
- A connection to the qualification environment ;
- A connection to the production environment.
This guide presents how to make a connection to the production environment. Regarding the qualification environment, please refer to the operating mode dedicated to the Chorus Pro Community qualification environment. The Community also contains details of the entire connection process.
All structures issuing or receiving invoices can request a connection to Chorus Pro, whether they are public or private structures. The creation of a connection form requires:
• To have read the technical documentation (in particular the sections):
o external specifications
o use Chorus pro in EDI mode
o OR use Chorus Pro in API mode
• For an EDI connection, have a valid digital certificate
• Have all the technical information for configuring the connection, in particular:
o in EDI: connection protocol, IP address, etc.
o in API: PISTE application code.
For structures to be connected in API, the creation of a technical user is also a prerequisite.
Before connecting to Chorus Pro in production, it is recommended to have made a connection for qualification, unless the publisher of the IT solution used by the structure is already connected to the qualification environment.
Structures which use a dematerialization operator (including third-party electronic transmission systems approved for EDI for local authorities and public institutions) do not have to make any connection request.
Structures relying on a third party tele transmission do not have to make any connection request (since the third party has already handled it).
Structures wishing to connect in API mode must create a technical user directly from the Chorus Pro solution.
The creation of a technical user profile is detailed in the user guide Creation of a technical account for API access in Production
To access Chorus Pro and create a connection form, you must
- Have a user account
- Have a structure file
The main manager of the structure must have the "Raccordement modification" authorization profile
If you are not the main manager of the structure, it is possible to:
- Request the attachment to a structure
- Request the "Raccordement modification" profile
CONNECTION MANAGEMENT
On the Chorus Pro services portal, click on the Connections area and then on "EDI" or "API".
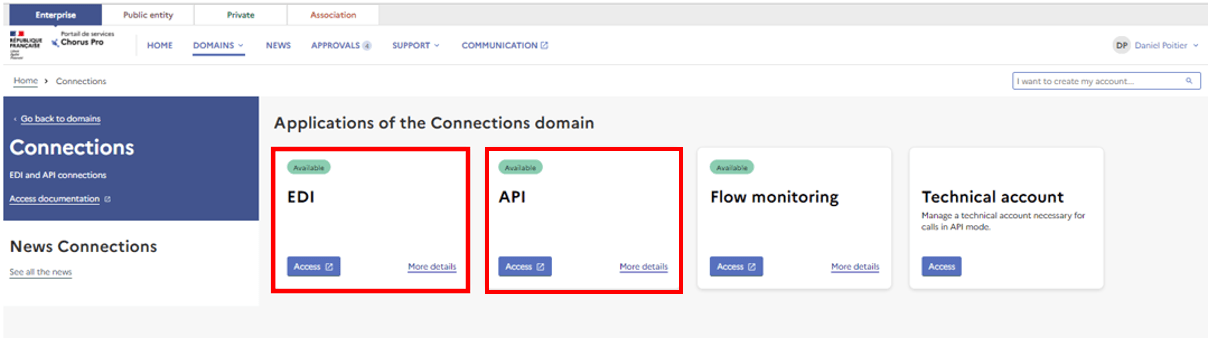
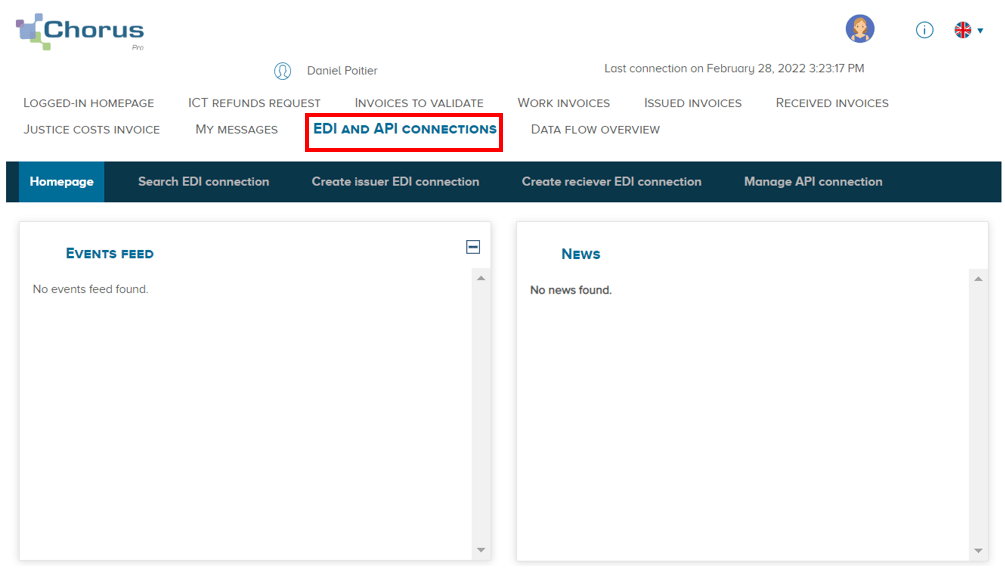
You are directly redirected to the "EDI and API connections" tab.
To create an EDI connection form, go to the Chorus Pro services portal. Log in with your login and password.
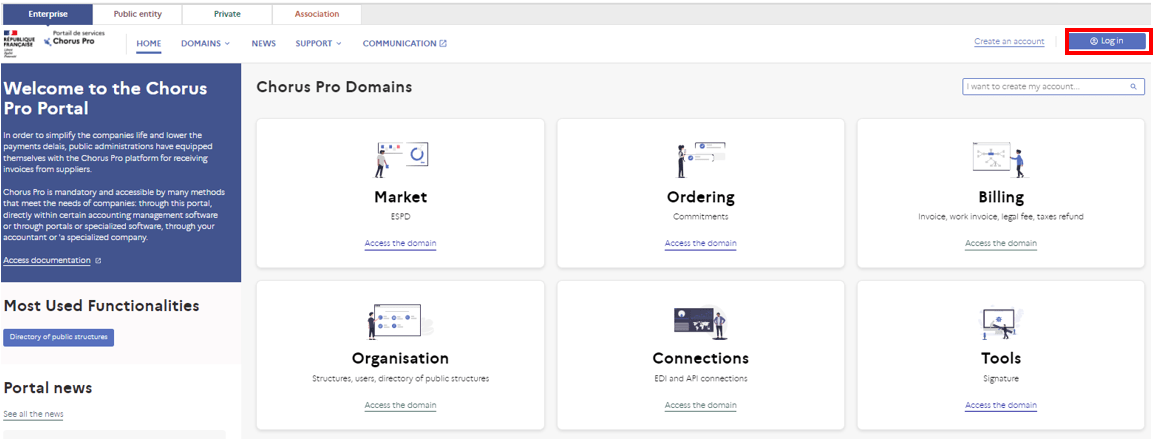
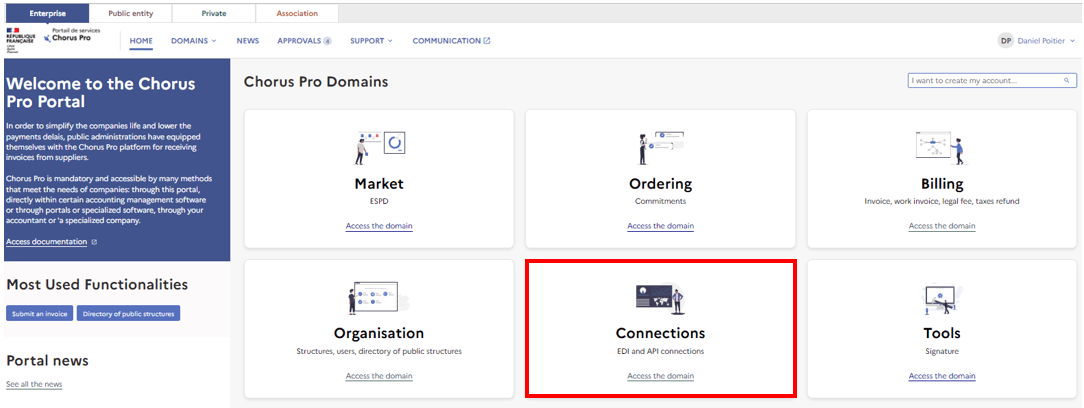
Once connected to the Chorus services portal, click on the "Connections" area.

In the "Connections" area, click on the "EDI" application.
You will arrive on this interface :
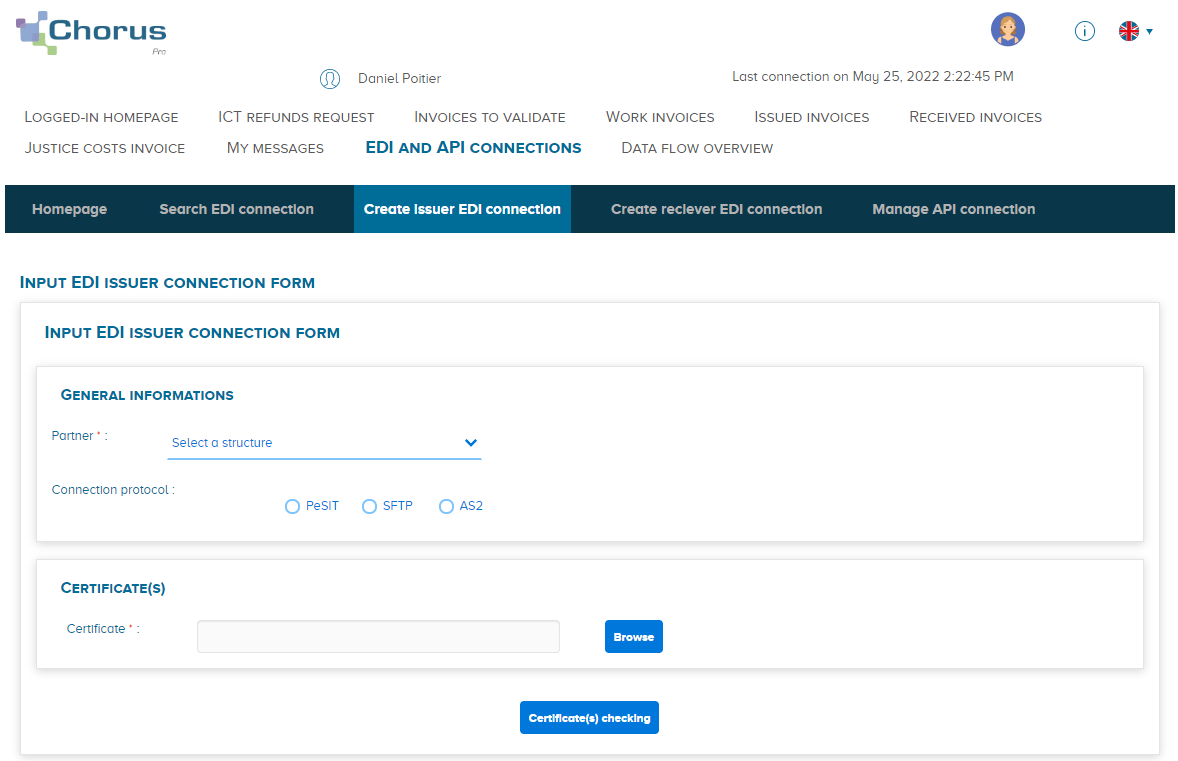
In the EDI and API Connections application, you have two options:
- "Create Issuer EDI Connection" to access the creation of an EDI connection record for sending invoices; or
- Create EDI Receiver Connection" to access the creation of an EDI connection record for the reception of invoices. On reception mode, it is possible to position oneself as a dematerialization operator, and in this case to define the delegating public entities for which the connected partner operates.
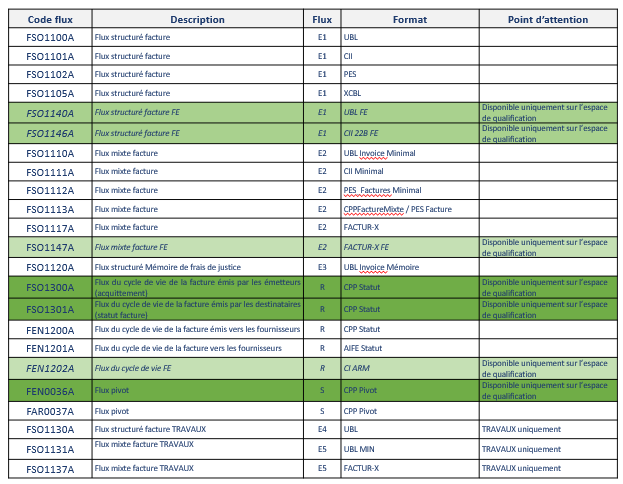
Note that the process of creating a connection form in EDI mode is the same whether you are in transmission or in reception mode. The only difference is in the choice of the interface code. In reception, the interface codes are as follows:

This point will be detailed later in this user guide
When creating the connection form, it is necessary to provide a valid certificate that meets the technical requirements for a connection to Chorus Pro. These requirements are detailed in the Certificates document.
Type of certificate:
- Client and server for EDI PeSIT connections
- Server for EDI AS2 connections
- Client for EDI SFTP connections
Vendor List: A link in the Certificates document refers to the list of certificate vendors (LSTI list).
Certificate format: Certificates must be transmitted in pkcs 7 format with the entire certification chain.
Attention: The same certificate cannot be used for several connections, even for different structures.
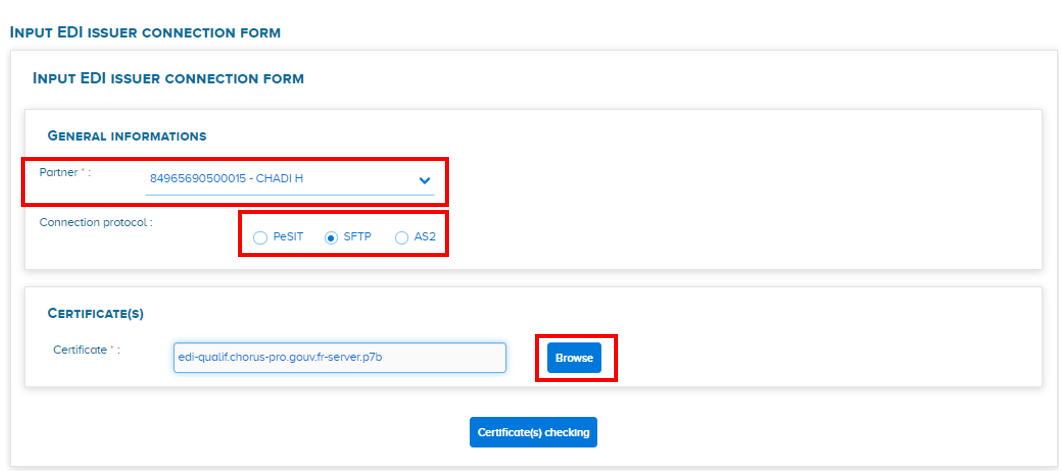
Select the structure for which the connection form is generated, using the Partner field, then confirm the Connection Protocol to be used.
Click on Browse to download the certificate(s) to your computer (depending on the connection protocol selected, the number of certificates may vary).
Validate your entry using the button Certificate(s) checking.
The connection protocols that can be used in EDI on Chorus Pro are:
- PeSIT - Protocole Echanges Système Interbancaire Télécompensation
- SFTP - Secure File Transfer Protocol
- AS2 - Applicability Statement 2 The connection protocols and their operating mode are detailed on the community in the External Specifications folder (Chap. 9 dedicated to connection protocols).
In the fields:
- General information: Confirm the validity period of the connection.
- Certificate(s): Check the data of the downloaded certificate.
- Technical contacts: Fill in the contact information of the person in charge of the technical implementation of the connection. If necessary, Chorus PRO support will contact the person.
- Network characteristics: Take note of the network configuration information to be used and, if necessary, complete it.
Example in SFTP:

- Interface codes in transmission: The following screen offers the possibility of selecting the EDI flows for which a connection will be made.

The flows available in EDI mode are detailed in the table below. Some choices of flows are not proposed for production connections (in bold) as they do not directly concern the entities that are connected:
For each interface code, confirm the processing modes to be implemented:
- No connection: no connection for the flow
- Complete: connection for the flow, an error on one of the documents of an incoming flow leads to the rejection of the entire flow (1 invoice in error on a batch of 100 invoices leads to the rejection of all invoices)
- Partial: connection for the flow, an error on one of the documents of an incoming flow, does not lead to the rejection of the whole flow (1 invoice in error on a batch of 100 invoices, prohibits the integration of the invoice in error, but does not block the integration of the 99 other documents). Comments: offers the possibility to contextualize your connection form.
- Submission: click on Submit to send the form. The Save button allows you to keep the form in draft mode without sending it for processing.
- Send: Select Confirm and Send to send the connection form.
Some public entities, in the context of the dematerialization of invoices, delegate the reception of their invoices to intermediation operators. They now have the possibility on the Chorus Pro services portal to validate a delegation request from a dematerialization third party for the reception of their invoices in EDI mode. To do so, the main manager of the public structure must select the EDI application in the "Connection" domain and access the "Manage EDI invoice receivers" menu.
To search for an EDI record, click on the tab Search EDI connections in the upper banner.
Enter a search criterion among those available (e.g.: Partner).

Once you have selected the criteria, launch the search by clicking on Search.
The results of the search are displayed at the bottom of the page, they can be exported by clicking on the Export Results button.

The connection plugs can have the following statuses:
- Activated
- Draft
- Deactivated
- Sent
- Sent Update
Connection records in draft status can be modified by clicking on the pencil button.
Please note: connection requests are automatically processed. An operational connection record has an Activated status. If your connection form does not have the status Activated the day after it is submitted, you are advised to contact Support.
Since mid-January 2020, the creation of a new API connection in certificate mode is no longer possible.
Only certificate renewal is possible on an existing connection. New PLC connections must be made in Oauth2 mode.
In case of difficulty, please contact the Chorus Pro support team.
1. Prerequisites
In order to make an API Chorus Pro call, it is imperative that the user first:
- Has created an account in PISTE by selecting the UNIVERSAL organization on which the API Chorus Pro is located.
- Has created its application in PISTE
These steps are described in the PISTE user guide made available to platform users.
Reference document available on the PISTE website:
https://developer.aife.economie.gouv.fr/help-center/guide
UserGuide_navigation (Version du 13/09/19)
This guide describes the steps to perform in Chorus Pro to declare its API connection in Chorus Pro.
Before this declaration, it is important to have fulfilled the prerequisites below:
- Have a Chorus Pro account
- Be attached to a structure
- Create a technical account
- Have the EDI & API Connection space open for modification
2.Procedure
2.1 Declaration of a PISTE connection
To create an API connection form in oAuth2 mode, go to the Chorus Pro services portal. Log in with your login and password.
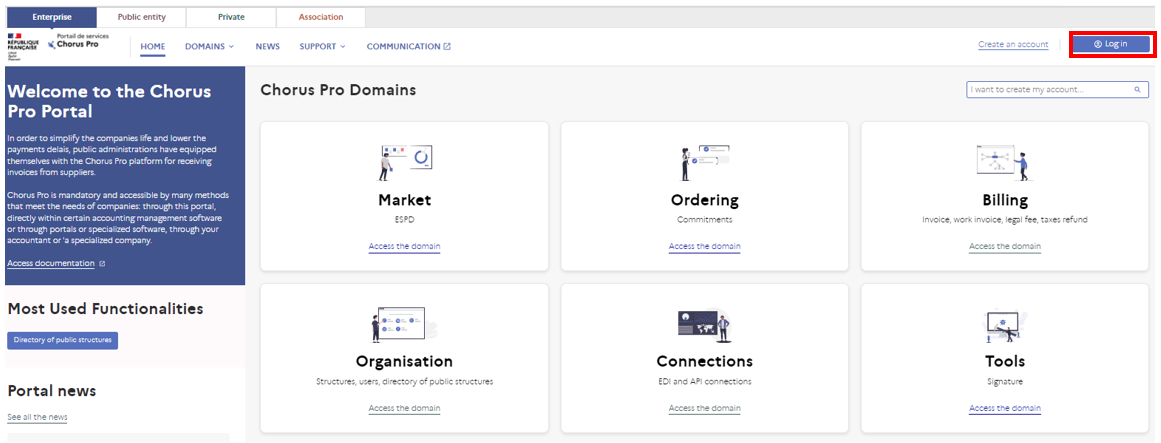
Once connected to the Chorus services portal, click on the "Connections" area.

In the "Connections" area, click on the "API" application.
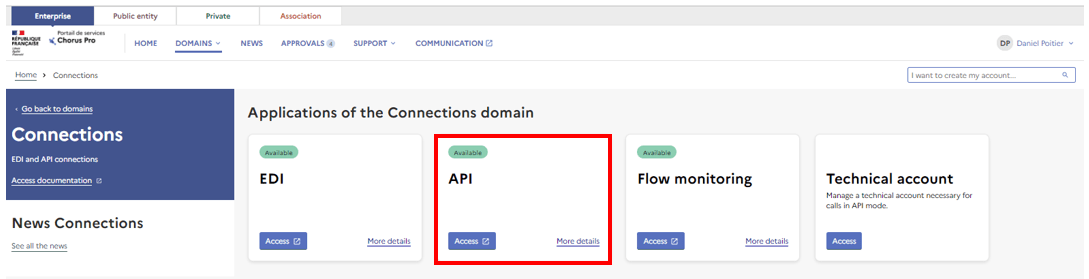
You will arrive on this interface:
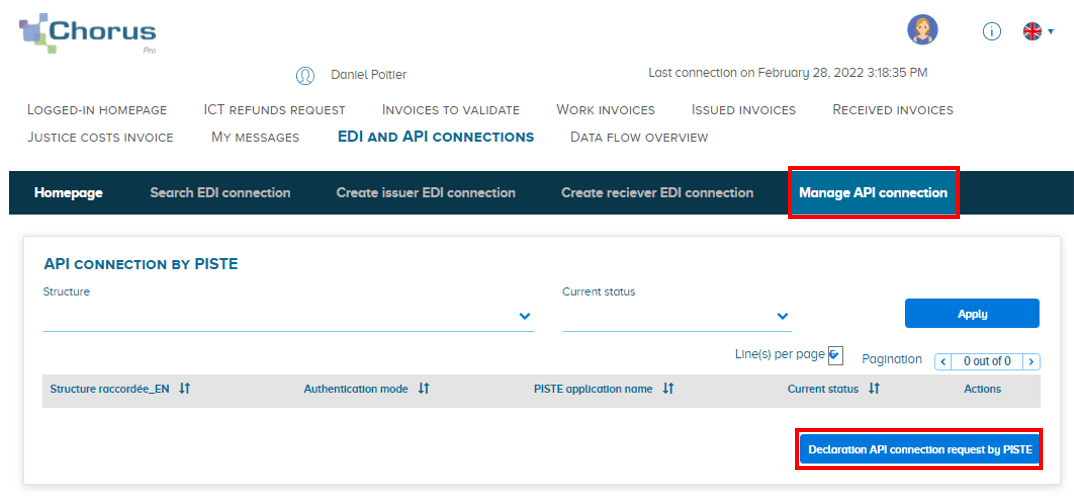
- Click on the Manage API Connection tab in the top banner
- Click on Declaration API connection request by PISTE at the bottom of the page as shown above.
The page for entering a PISTE connection is displayed.
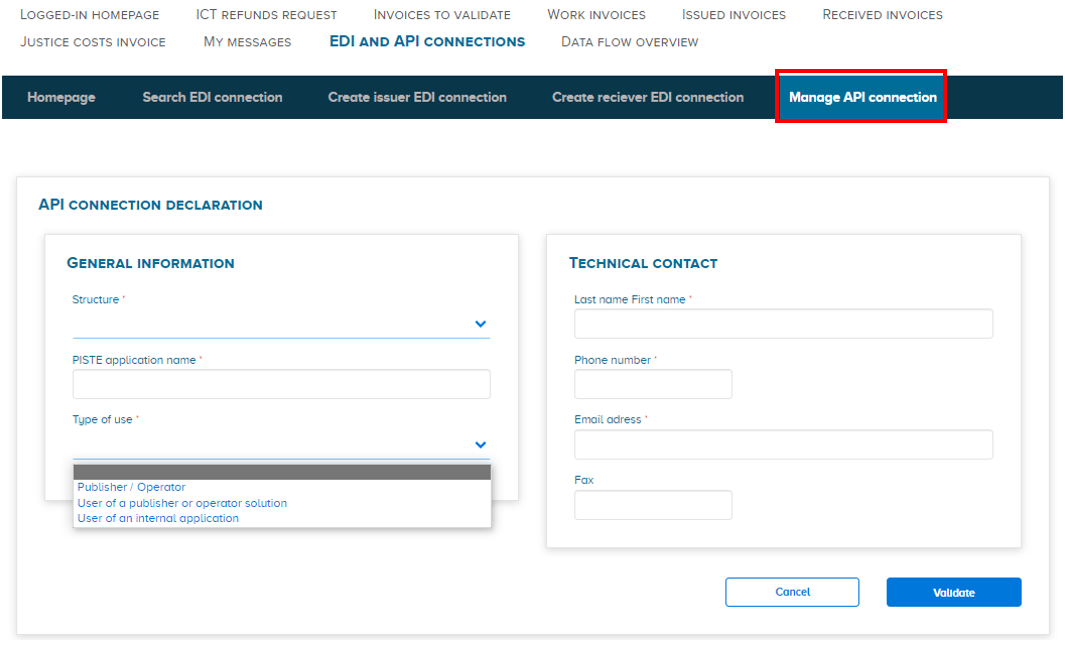
- Fill in the data, paying particular attention to the field of the PISTE application name. This field must be filled in with the value entered in PISTE during the application creation step. The respect of case sensitivity is important because it will determine the success of future API calls.
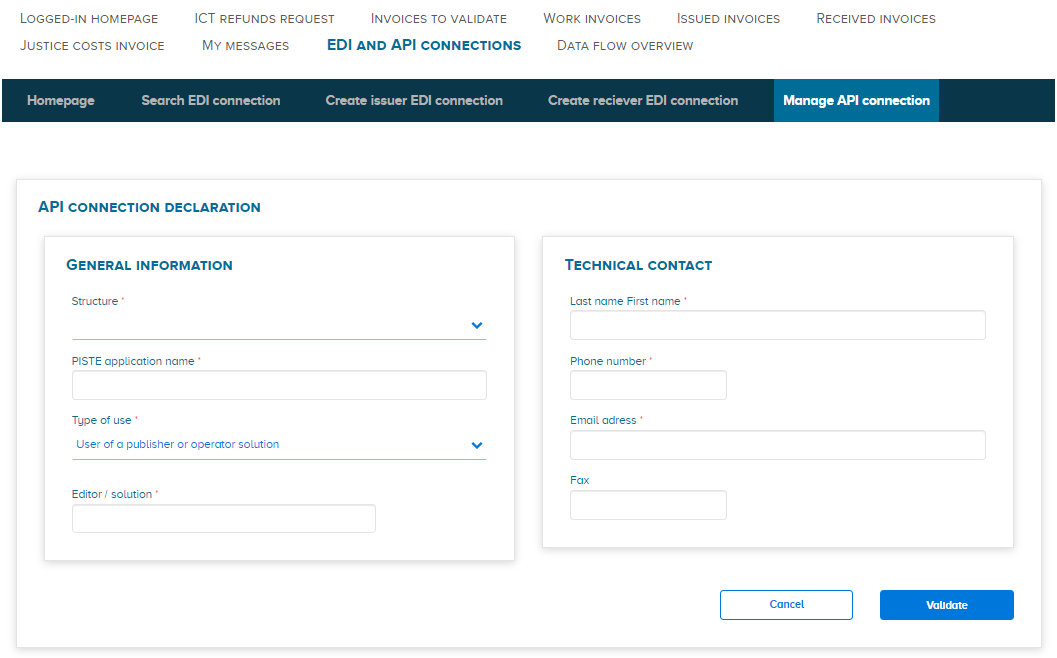
- The user must also enter the type of use by selecting it from a drop-down list. If the user indicates that he is a user of an editor or operator solution, he is asked to indicate the name of the Publisher/operator.
- After entering the data, validate the connection, which changes to ACTIVE.
Click on the Manage API connection tab in the top banner.

By default, all existing connections, active or not, are displayed, in certificate mode as in Oauth2 mode.
Depending on whether the connection is in certificate or Oauth2 mode, you may need to filter on Structure and Current status, either in the upper part of the screen (connection by certificate) or in the lower part (connection in Oauth2 mode - Track).
For connections in certificate mode, the latter being inoperative in principle since 31/12/2020, only consultation is possible.

Last Update: April 16, 2024