

The Chorus Pro services portal offers features that allow you to manage the information related to your user account. To access it, log in and click on your name at the top right of the screen. Then, click on the item of your choice in the drop-down list: "My account", "My affiliations", "My authorizations", « History of my requests ».

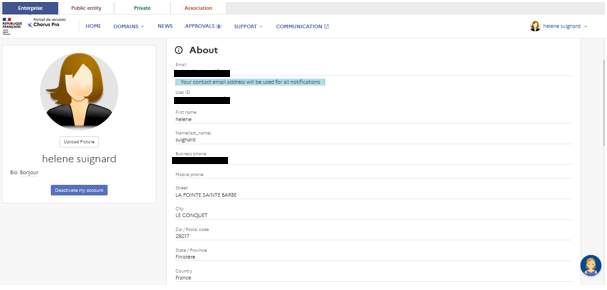
To access your user account, once you have logged into the Service Portal, click on your name at the top right of the screen and click on "My Account" in the drop-down list.
This will take you to the form containing your personal information: last name, first name, phone number, work address, etc.
On the left, you can also consult your profile photo and your biography.
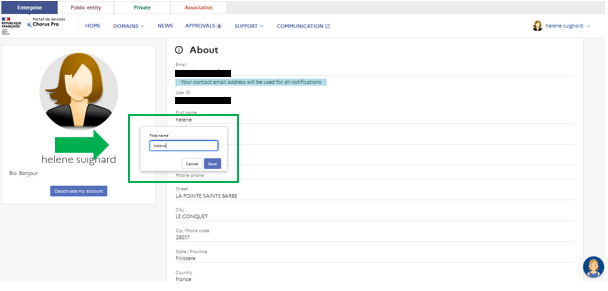
To modify a piece of information, simply click on the desired field. A small window containing an input field will appear to allow you to modify the desired data. To validate your entry, click on "Save".
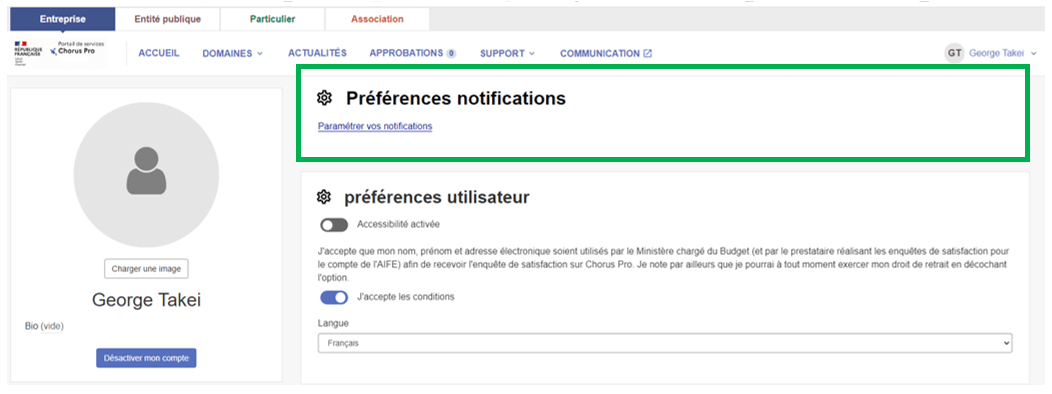
You can set up notification alerts to keep informed of any activity happening on your account by clicking on the "Set up your notifications" button in the Notifications Preference paragraph.
A pop-up window will open and you can select one or more applications for which notifications can be sent to you to monitor a treatment, i.e. Certificates of Transferability, Commitments and CPRO Invoicing.
 For example, ticking the CPRO Invoicing box will enable you to receive notifications of new events and track the processing of your invoices through the lifecycle statuses. Then click on "Save".
A weekly summary of the movements made on the structure will also be sent.
To deactivate your user account, simply click on the "Deactivate my account" button under your biography on the left side of the screen.
You will then be redirected to the "Deactivate/Reactivate a user account" page. You will then need to check the "Disable my access" box and click "Submit".
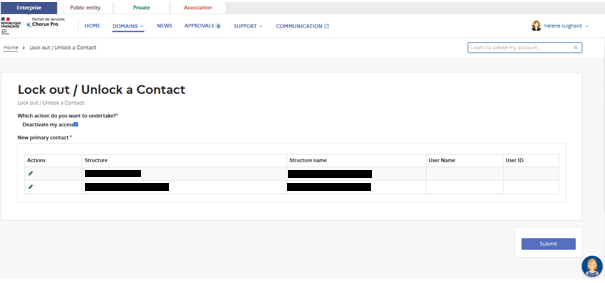
Attention: If you are the main manager of the structure, you will be asked to designate a new manager before deactivating your account : https://communaute.chorus-pro.gouv.fr/documentation/manage-users/?lang=en
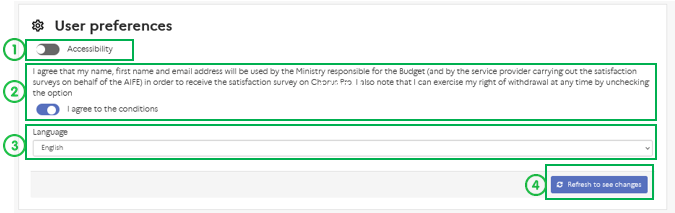
The "User Preferences" block allows you to manage your accessibility preferences and choose the language of the tool.
To enable accessibility, click on the button below the "Accessibility Enabled" field (1). This will change color when the option is enabled.
To accept the conditions allowing the AIFE to use the account to send satisfaction surveys, click on the button. The button will change to green when the option is enabled (2).
To change the language, click on the small arrow to the right in the "Language" field and select the language of your choice from the drop-down list (3).
To apply your new preferences, click on the "Refresh to view changes" button (4) that appears when changes are made.
To be able to access the various Chorus Pro features, all users must be attached to their structure (to a public or private entity).
To consult your attachments, click on your name at the top right of the screen and click on "My affiliations" in the drop-down list.
This will take you to the "My affiliations" block, which lists all the structures to which you have access.

To request an affiliation, click on the "Request an affiliation" button.
 You will be redirected to the "Request to be connected to a structure" form.
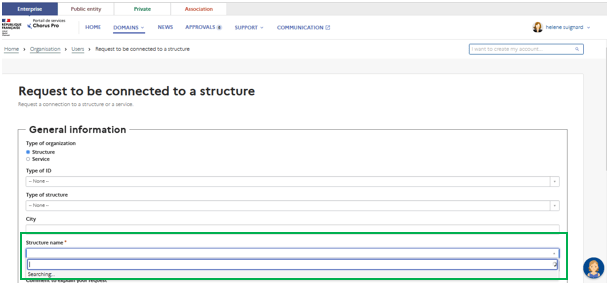
You will then have to fill in the information of the structure to which you wish to be attached. Required fields are marked with a red asterisk.
In the Company Name field, you can search for a structure by its identifier, company name or type.
It is mandatory to enter a comment to explain your request.
To validate your request, click on "Submit" at the bottom right of the form.
It is possible to make an affiliation request to the service level (instead of the broader "structure" level).

When the structure is selected, the services are displayed. You can have access to all the departments or just a few. If you want to be attached to a particular service, check the service(s) you want to be attached to on the right.
In case the selected structure has many services, in the search bar you can enter the code or the name of the service you want to be attached to, and it will be displayed.
Then click Submit. A green message will indicate confirmation of the annexation request. You are then automatically redirected to the Users area page.
Please note that, in order to be validated, your affiliation request must be validated by the main manager or a user with this right on the requested structure.
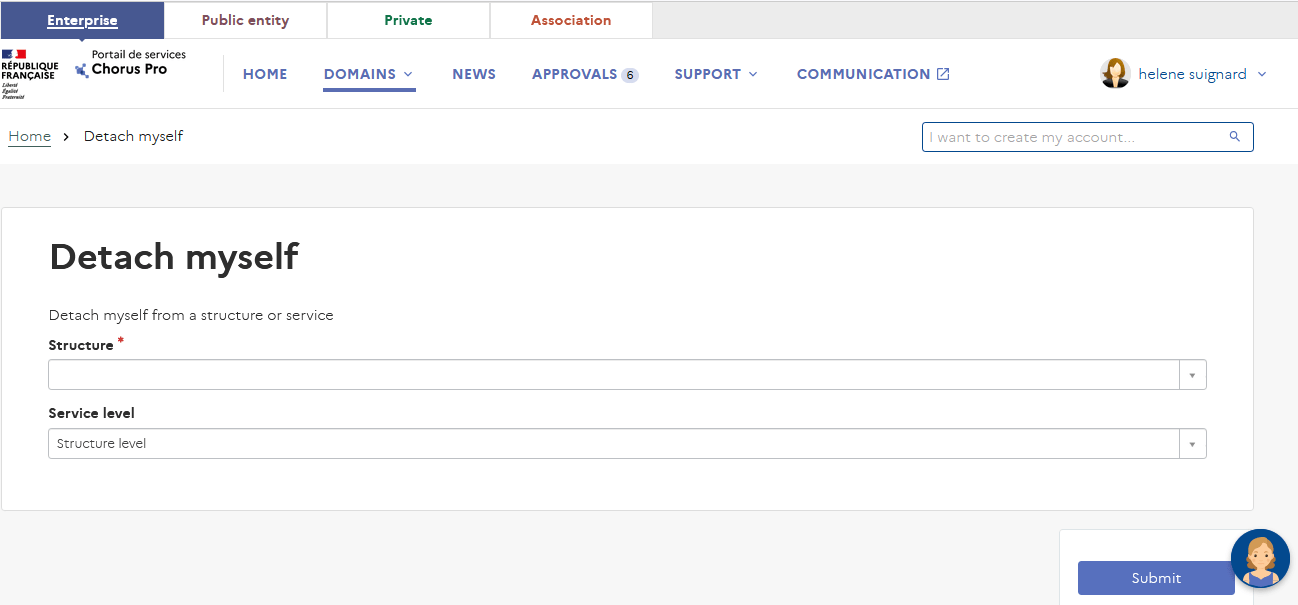
It is also possible to remove your attachment to a structure by clicking on the "Detach myself" button. You will be redirected to the dedicated form.
You will then be able to choose the structure from which you want to detach yourself, and at which level: structure or service level.
To validate the operation, click on "Submit" at the bottom right of the form.
It is possible to be detached from several services on which you are authorized. To do so, check the services level to which you wish to be attached.
To validate the operation, click on "Submit" at the bottom right of the form.
To view the permissions you have for the facilities to which you are attached, click on your name at the top right of the screen and click on "My authorizations" in the drop-down list.
The "My authorizations" table lists all the profiles that are assigned to you for each structure.
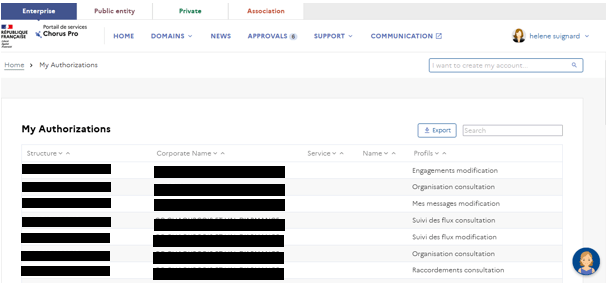
Each profile is composed of the name of a domain or application and the level of access you have. For example, the "Issued Invoices - Modification" profile gives you modification rights in the "Issued Invoices" application.
To manage your authorizations, click on the "Manage my authorizations" button at the bottom of the "My authorizations" list.
In the form that appears, select the structure and the department for which you wish to manage your authorizations.
A table detailing the profiles you have is displayed.

You can then :
- Add a new permission by clicking on the « Add » button (1),
- Delete all the authorizations you have by clicking on the "Remove all" button (2),
- Modify an authorization by clicking on the pencil icon (3) in the "Actions" column on the line of the authorization concerned,
- Delete an entitlement by clicking on the cross icon (3) in the "Actions" column on the line of the entitlement concerned.
To validate the operation, click on "Submit" at the bottom right of the form.
A green message will indicate confirmation of the clearance changes. You are then automatically redirected to the Users area page.
It is possible to change your login address (e.g. the email address used as a login to connect to the Chorus Pro portal), if requested.
Your login address is used to retrieve lost passwords. It is therefore essential to guarantee that this login address is related to a functional email address you can easily access. Otherwise you may not be able to receive the lost password regeneration email. If you need to change the email associated with your login address, click on "change my login address" in the drop down menu appearing when you click on your name, on the upper right side of the screen.
You are redirected to a new page, where you can type your new email address in the following form :

Once the form is completed, click on the "submit" button to validate your change. You'll receive a confirmation email on the new email address you indicated on the form. Cut and paste the content (activation link) of this confirmation email into your Internet navigator and press enter to validate the change.
Please note that it is not possible to make more than one login address change at a time. If you started a change process, you'll have to complete it in order to be able to process another demand. Hopefully, without any action from your part on the activation link sent to you by the portal within the 24 hours following the change request, demands are automatically cancelled. So if you made a mistake (for instance, mispelling your email address), you can simply wait 24 hours to initiate a new demand with the correct informations.
Multi-factor authentification consists in requesting an additional security code whenever you login to your account with your password. It adds a second layer of control to login procedures, which makes it harder for malicious individuals to usurp your accounts.
This second authentification factor (the security code) remains valid for a limited duration and is sent to you either through an email or a dedicated mobile application. Alternatively, a security key can be used as your second factor authentification.
Multi-factor authentification is compulsory since september 2024 on the Chorus Pro portal. You can choose your favorite authentification mode directly on the portal, following the guidelines below.
In order to manage your authentification factors (regular password or second authentification factor), click on "My multi-factor authentification" in the drop down menu which appears when you click on your name, on the upper right side of the portal's welcome page.

You are redirected towards a page displaying three different options, from left to right :
- Adding an application : this option allows you to register the application you will use to receive your authentification codes.
- Changing you password
- Adding a security key

In order to change your password, click on the "Change my password" option.
Then, type your current password and the new one in the form. Bear in mind that passwords must respect these constraints :
- a minimum of 12 characters
- at least one number
- at least one character in small print
- at least one charcter in capital letters
- at least one special character
Confirm the password and click on the "update password" button.

In addition to your password, a secondary authentification factor must be defined to secure the access to your portal account : it's a temporary code sent by an authntification application. Therefore, you need to first install this application on your mobile phone. You get the choice between these applications from the market :
- FreeOTP Authenticator
- Google Authenticator
- Microsoft Authenticator

In order to install these free applications on your smartphone, visit the "Application Store" of your mobile phone (PlayStore, App Store ...), search the application by typing its name in the search bar, and install it. Once installed, the logo of the application you chose to install will appear on your smartphone screen, among your other applications.
By default, the security code embodying your second authentification factor is always sent to the email address corresponding to your Chorus Pro login account, but it might be more convenient to use the application directly on your mobile phone in order to avoid having to check your email each time you attempt to login.
Below an example of how the codes are sent through emails :
The first time you add an application, you are directed to the following page on the Chorus Pro portal :

- Open the authentification application of your choice
- Scan the QR code
- The chosen application displays a code : below, an example of how a security code is delivered on a smartphone through an authentification application. Presentation may vary depending of the application you chose, but basically, the principle is always the same :

- Enter the given code into the form
- Give a name to the mobile device you use
- Click on "add application" to validate your choice.

If you later need to change either the authentification application or the mobile device you are using, you can go back to the "Add application" page to enter the new parameters.
Each user account can use only one authentification application at a time. If you want to change the application you use, you'll thus have to cancel the old application before you can declare a new one. Application suppression is made using the "trash bin" button which appears at the end of the line bearing the name you gave to your device :
Once you have installed an authentification application, each time you will connect to the Chorus Pro portal, you'll be asked a security code. Simply go into the application installed on your mobile phone to retrieve the requested code and enter it in the required field to log in.

Should you encounter any problem while logging in, you can always change your double authentification mode by clicking the link "use another connection mode" under the enter the authentification code page.
You'll be presented with two options : "application" or "email". Choosing "email" will send the security code to your login account's email address. This is useful when you have lost access to your mobile device or application as a means to login on the portal. Once you are logged in, you can go back to the "multi factor authentification" page, delete the old application and/or device and install a new one.
Alternatively, one can use a security key as his second authentification factor. In that case, you must first register the key on your portal account.
- Go to "My multifactor authentification" (from the drop down menu which appears when you click on your name) and choose "add a security key".
- Click on the blue button on the upper right side of the screen ("add a new key").
- The portal asks you to insert the key. Insert it and validate.
From now on, each time you login to your Chorus Pro account, you'll have to insert your external security key into your computer to login.
In case you need to manage your keys, simply go back to the "add security key" page.

Last Update: September 19, 2024