

Introduction
In case of difficulties faced when using Chorus Pro, the user has the ability to create a ticket. Tickets are categorized to characterize the nature of the request. Depending on the chosen category and subcategory, the request will be sent : • Either to the « Chorus Pro Support Team » responsible for assisting portal users. • Or to the « business service », in charge of processing invoices, justice costs invoices or ICT refunds requests.
ENTERING A REQUEST
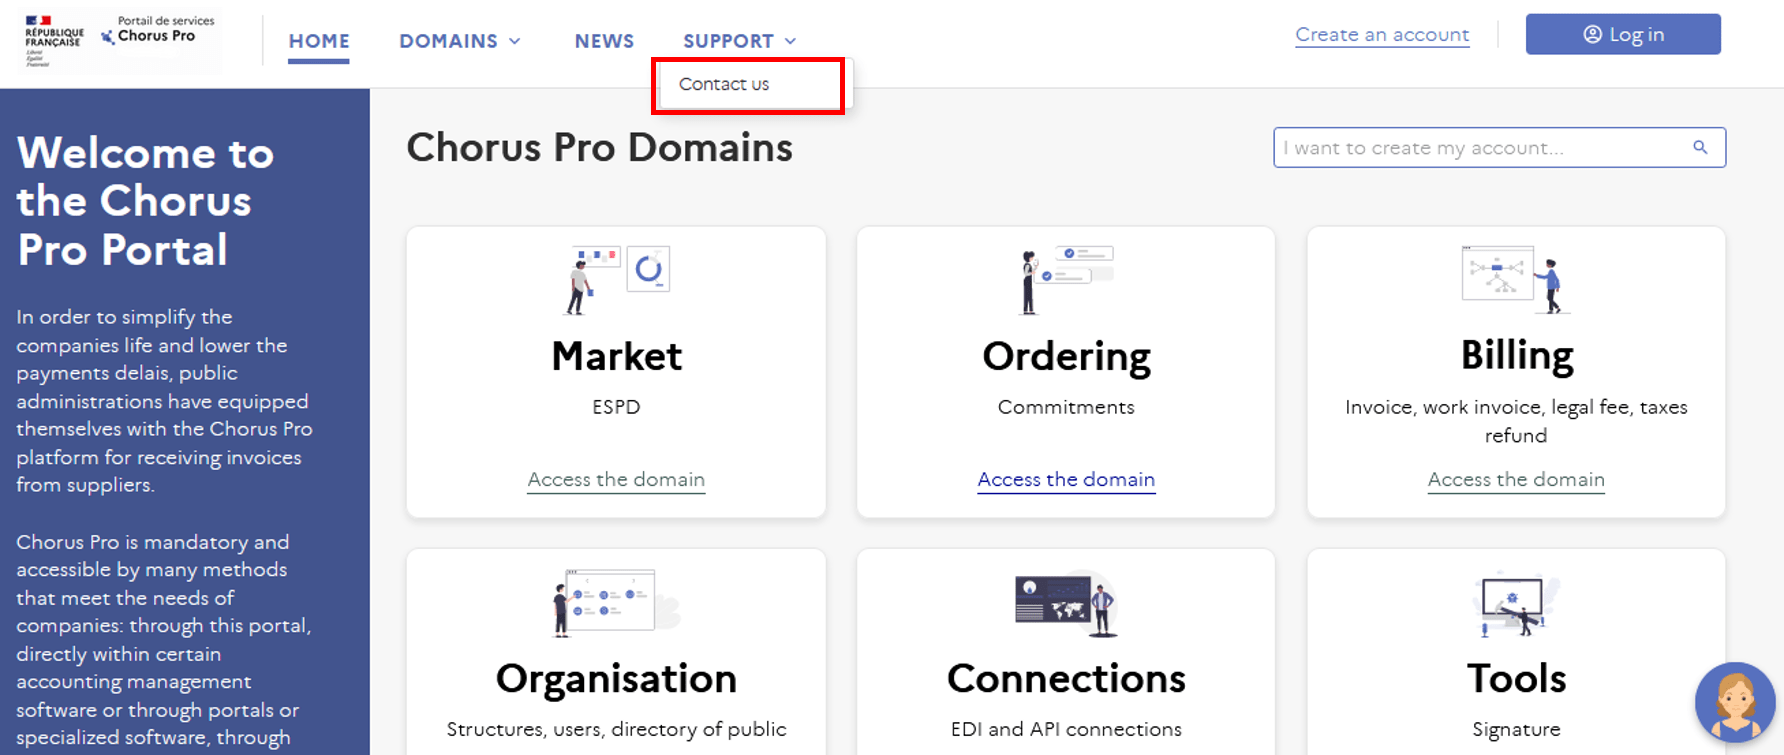
This mode should only be used by users who are not able to connect : To open the form, click on the « Contact us » link at the bottom of the Chorus Pro homepage (https://chorus-pro.gouv.fr).

You can click on one of the three options available to you:
Live exchange with an agent
A live chat window appears at the bottom right of your screen to chat with an agent.
Chat with your live agent ClaudIA
A window appears at the bottom right of your screen to ask your questions to ClaudIA.
Send request help from the support
By clicking on "Send a ticket", you can fill in a form. A new window will appear offering you to log in if you have no connection problems.
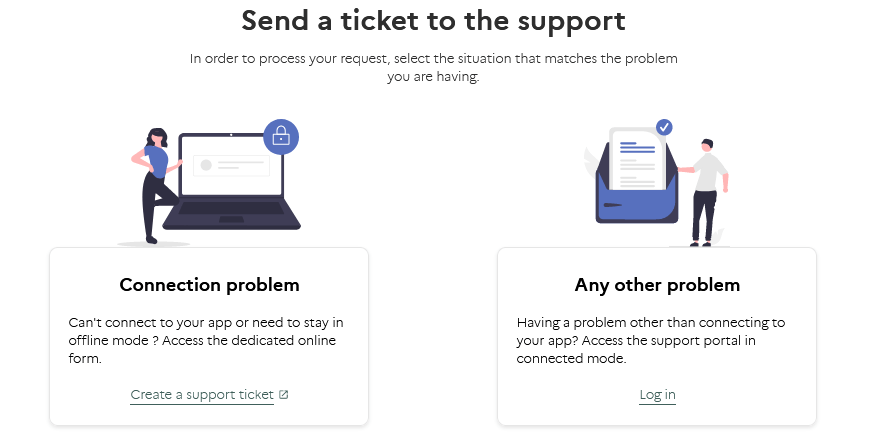 In a non-connected mode, you can click on "Create a support ticket" and fill in the following form:
Fill in the fields of the form :
- « Category »
- « Subcategory »
- « Email address »
- « Short description »
- « Description » of the problem encountered
> Enter the captcha visual and click on "Submit Captcha". > Click on the « Submit » button. A sending confirmation window is displayed with the number of the ticket that was generated by Chorus Pro. It is advisable to note this number to facilitate follow-up. The email confirming the submission of the ticket and the response email will be sent to the email address you entered in the form.
For an already authenticated user, tickets are sent directly from the support portal. To open the form, click on the « Contact us » link at the bottom of the Chorus Pro homepage (https://chorus-pro.gouv.fr). 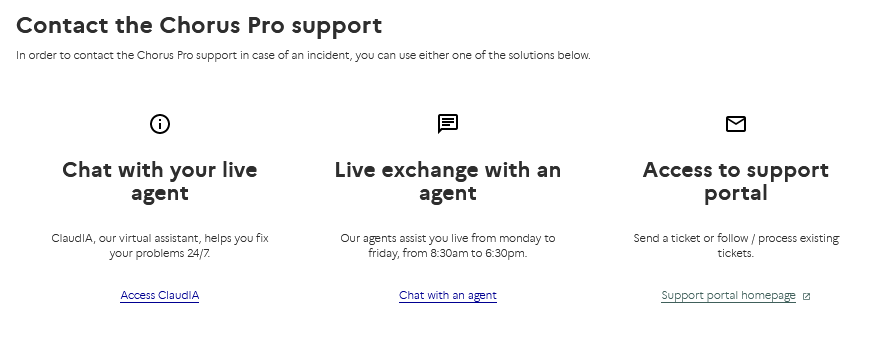
You can click on one of the three options available to you:
Live exchange with an agent
A live chat window appears at the bottom right of your screen to chat with an agent.
Chat with your live agent ClaudIA
A window appears at the bottom right of your screen to ask your questions to ClaudIA.
Access to support portal
By clicking on "Support portal homepage", you can create a ticket and view your issued tickets in the support portal.
 To create a ticket, you can click on the "Create a ticket" button. A form opens and the fields with an * must be filled in:
 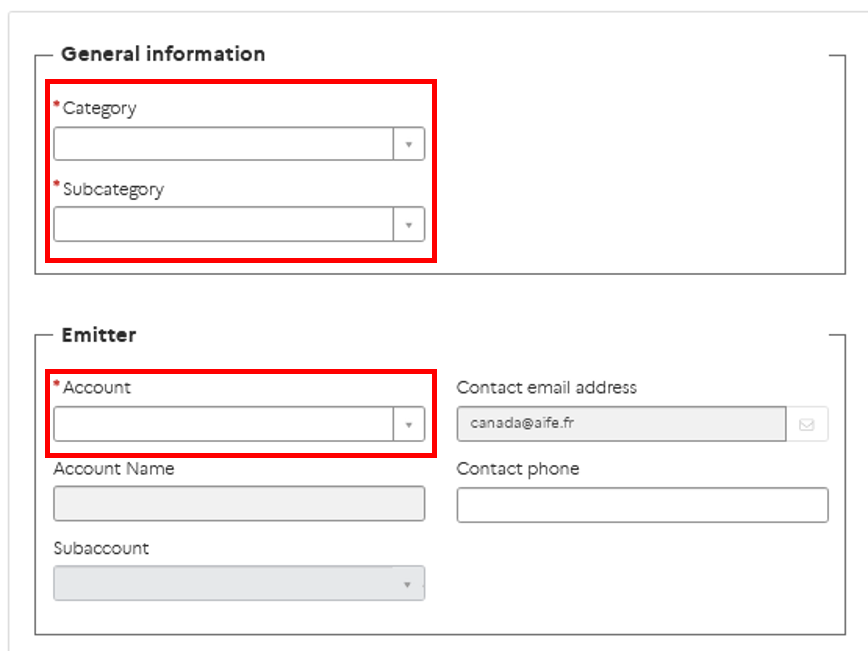 A. In the « General information » section
- Select a category and a subcategory from the respective drop-down lists.
The "Subcategories" in the drop-down list with "M -" in front of them correspond to requests sent to business support. In this case, a recipient organization must be filled in. All other subcategories correspond to requests sent to technical support and do not require a recipient organization identifier. The "Subcategories" in the drop-down list with "M -" in front of them correspond to requests sent to business support. In this case, a recipient organization must be entered. All other sub-categories are for requests sent to technical support and do not require a recipient organization ID. B. In the « Emitter » section
- Select the issuer structure in "acccount" for which you want to enter the request (the drop-drown list identifies all the structures for which the user is authorized).The ID is automatically filled in.
- Indicate, if necessary, the issuer service.
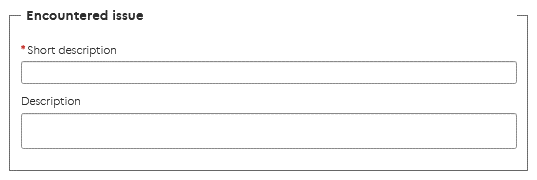
C. In the « Encountered issue » block
- Give your ticket a title in "Short description".
- Describe your problem in detail in "Description".
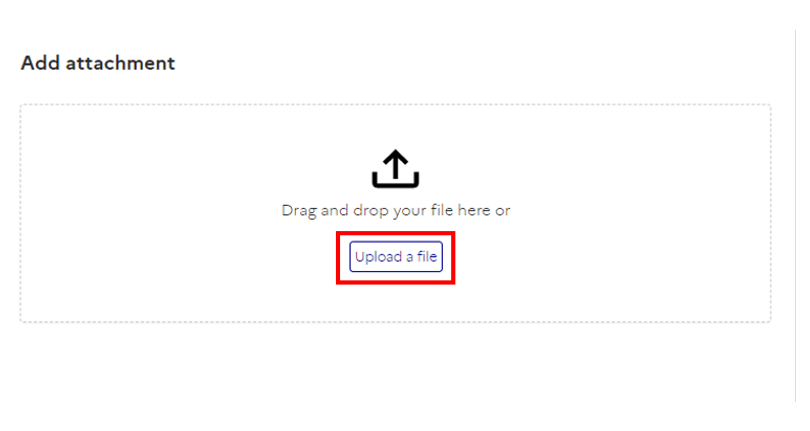
You can add attachments by clicking on the "Upload a file" button as shown in the following figure:
Once your attachment is added, you have three options through the following buttons:

- “Submit”: your ticket will be sent to the recipient corresponding to the chosen category and subcategory.
- “Save and exit”: your ticket will be saved as a draft. This status will allow you to come back to the ticket later, modify it if necessary and send it.
- “Exit without saving": Cancel the changes and delete the ticket being written. No trace of the current ticket will be visible on your dashboard.
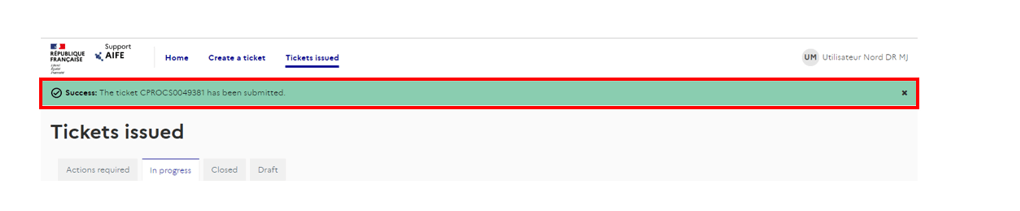
After clicking on one of the buttons, a confirmation of the success of the operation will appear at the top of the page:
You can attach files (screenshots, vouchers) by clicking on the button ![]()
When the entry of the request is completed, click on the « Submit » button to forward it to the recipient![]()
A confirmation pop-up is displayed on the screen.
Some tickets refers to a specific purpose : an invoice, a legal expenses memory or a reimbursement request. In such a case, you have to provide the information referring to the purpose concerned in the « General information » section. These fields are only available for certain combinations of category/subcategory, such as (*):
- Issued invoices / M-Different amount paid
- ICT refunds request / M-Request rejection
- Legal expenses memory/ M- Revision of the amount of a brief
To complete the request, you must inform :
- The object type
- The object number

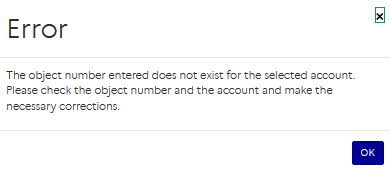
If one this information is not completed, the following error message is displayed at the time of validation :
![]()
The entered value in the field « Number » must match :
- an existing object number into Chorus Pro (invoice, reimbursement request, legal expenses memory)
- the selected object type
If this is not the case, the following error message is displayed :
A request about a specific purpose is sent to the recipient of that purpose :
- Public structure (or service of a public structure) for an invoice
- Public Finance Departmental Service for a reimbursement request
- Centralized service for legal expenses
It is possible to send a request of this type for :
- A payment request (invoice, reimbursement request, legal expenses memory) already sent to the recipient,
- A payment request at a « Draft » status.
To send a payment request at a « Draft » status, the recipient of the request must be identified. For example, if you wish to send a request to the invoice recipient while the invoice has not been sent yet, the recipient information must be filled in the “draft” invoice. When an invoice has been rejected, you can send a request to the invoice recipient for details about the rejection.
In the “General information” section :

- Select :
- Category : « Invoices sent »
- Sub-category : « M- Question for the recipient of my invoice »
- Object type concerned by the request : “Invoice”
- In the “Object number” field, enter the number of the invoice concerned.
- Fill in the "Emitter" and "Problem encountered" blocks.
- The "Recipient Organization" block is filled in automatically with the recipient of the invoice.
Then click on « Submit ». ![]()
The request will then be automatically forwarded to the public structure to which the invoice was originally sent.
Categories/subcategories linkage
The table below shows the possible linkages between categories and subcategories when entering a request for a business service : 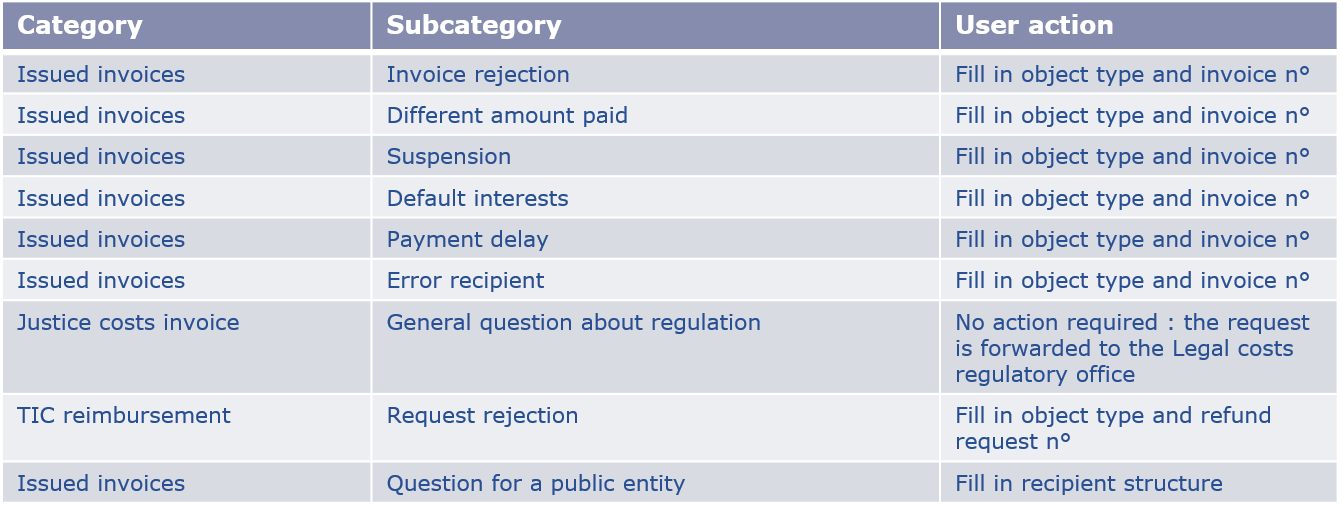
To request a public entity for a general subject that does not concern a particular invoice, create a ticket by selecting :
- Category= Invoices sent
- Subcategory = M- Question to a public entity
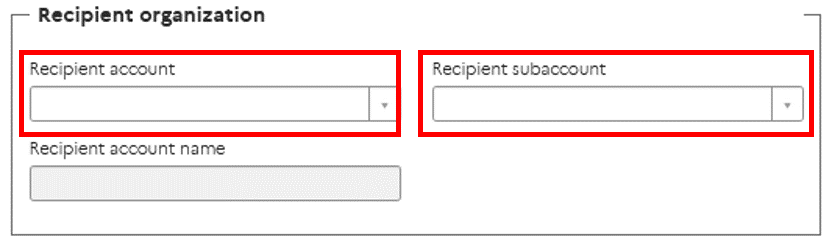 The user must then :
- Indicate the SIRET of the recipient structure,
- If necessary, fill in the field « Recipient subaccount», when the request must be sent to a particular service.
To request a public entity for a general subject that does not concern a particular invoice, create a ticket by selecting :
- Category= Invoices sent
- Subcategory = M- Question to a public entity
The user must then :
- Indicate the SIRET of the recipient structure,
- If necessary, fill in the field « Recipient subaccount», when the request must be sent to a particular service.
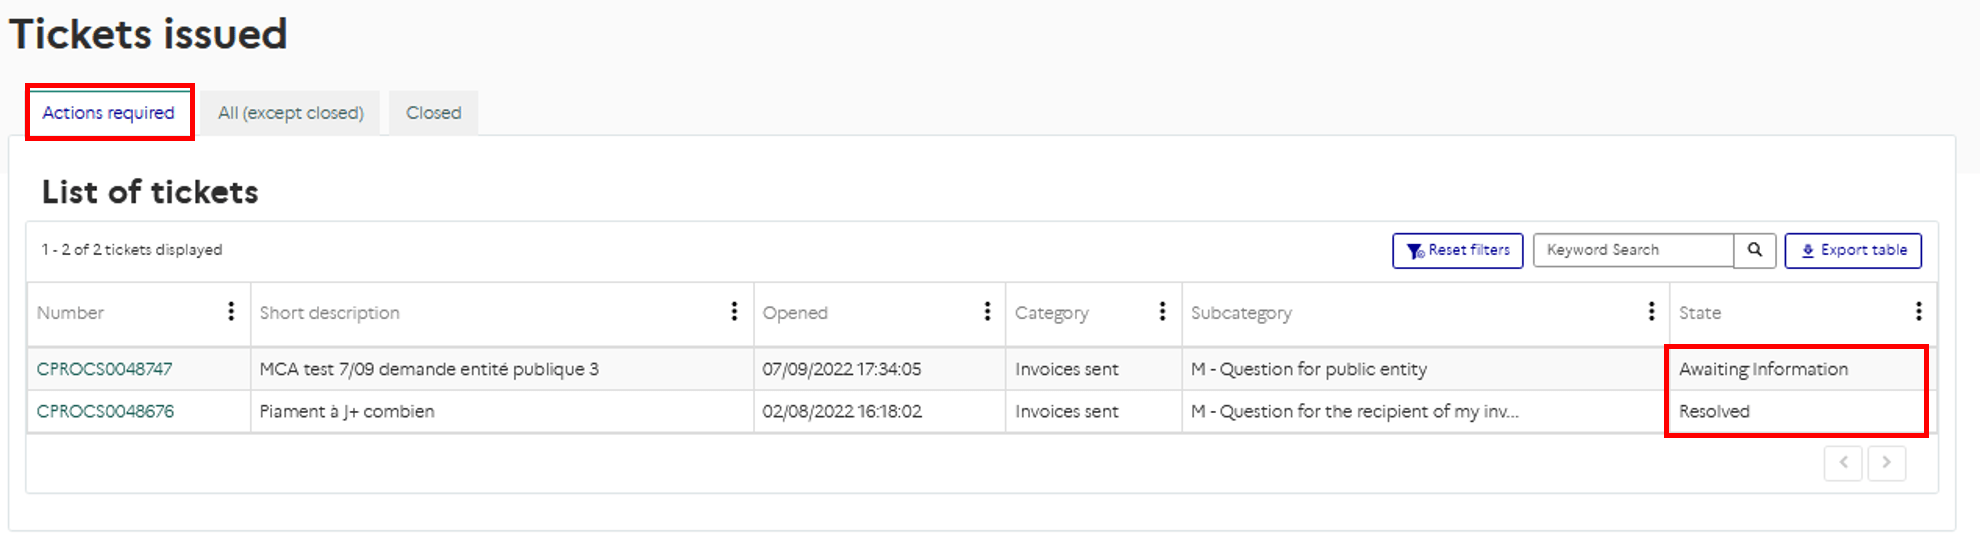
VIEWING SENT TICKETS
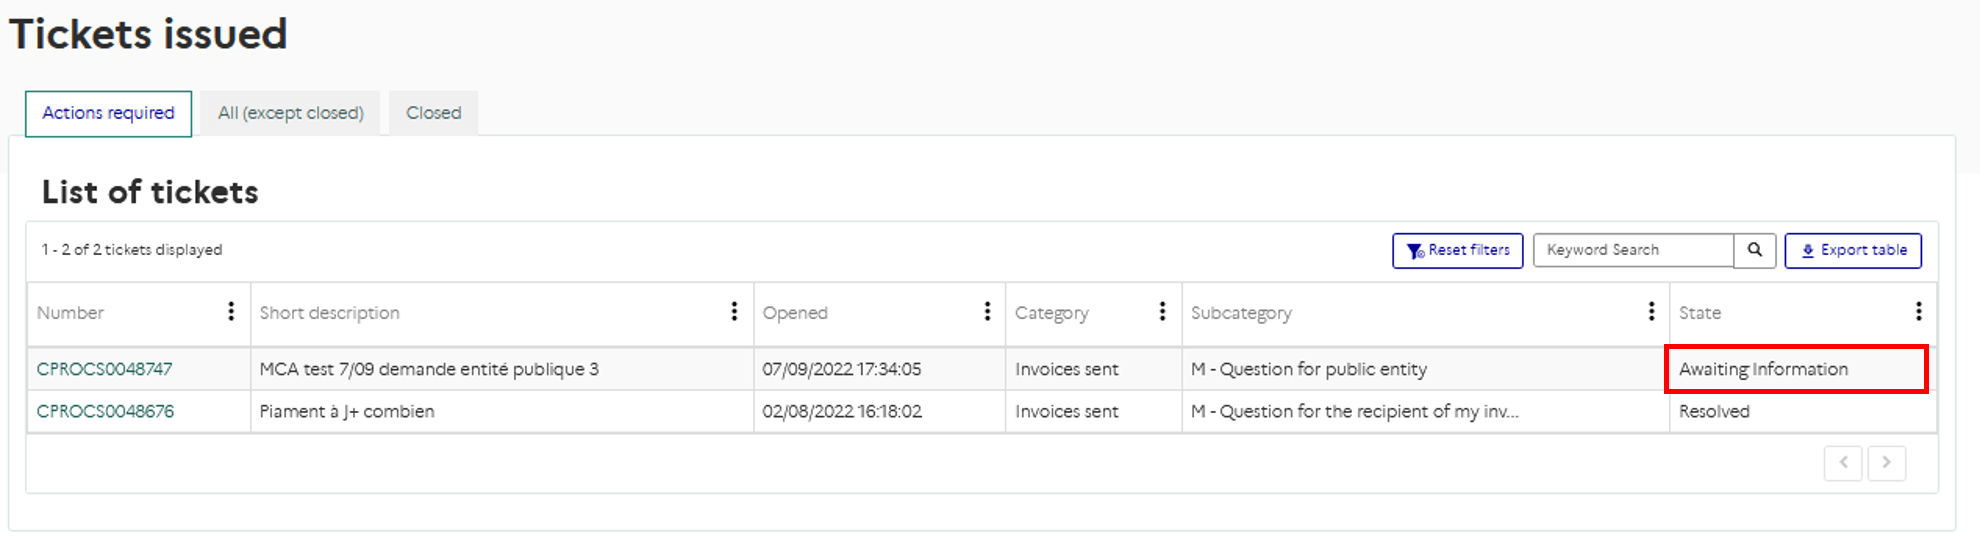
In "Tickets issued" you will find a list of issued tickets. The "Actions required" tab shows all tickets for which an action is required on your part, i.e. tickets with the status "Awaiting information" and "Resolved".
The expected action depends on the status of the ticket.
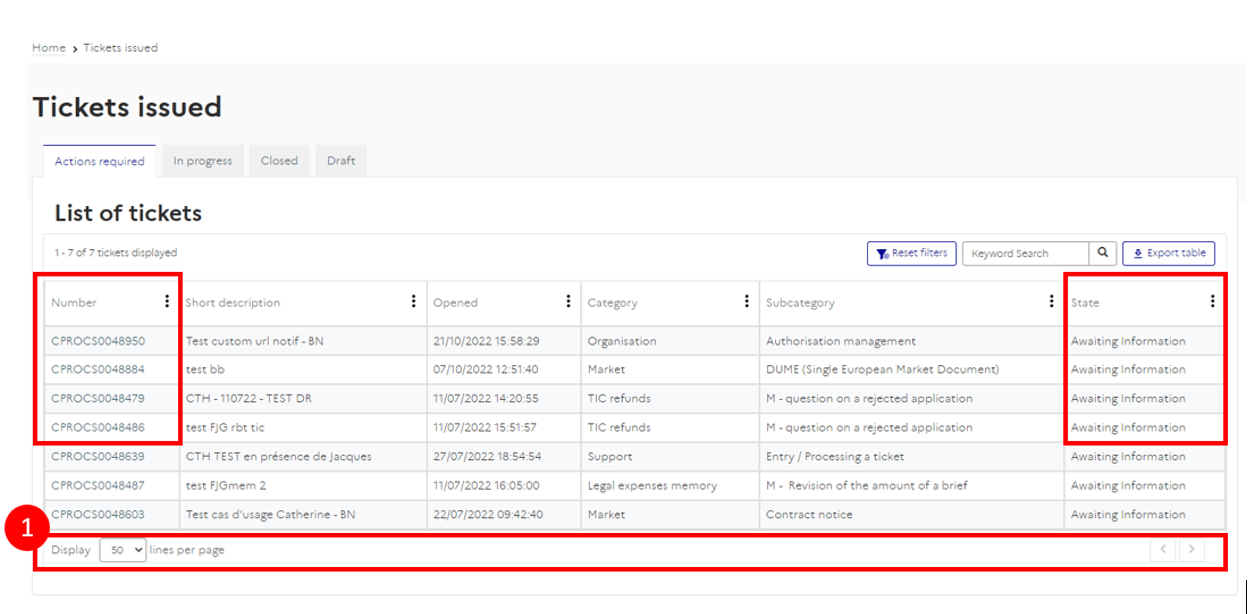
To improve the user experience, the interface of Chorus Pro offers the possibility to manage its display (1) by choosing numbers to navigate on the different pages of your dashboard.
To view the detail of the ticket and to process it, click on the number of the ticket concerned.
A ticket in "Open" status does not appear in the "Required actions" tab. It is possible to find it by using the "All (except closed)" tab.
The table below lists the statutes related to the processing of the tickets issued :

The « Search » tab of the « Sent requests » area allows you to search the tickets according to several criteria. In the « Search criteria » section : You must enter or select at least one of the proposed criteria.
In the search bar :
The user must enter or select at least one criterion from those offered.
Examples :
- Request number
- Category
- Request status
- Etc.
Click on the magnifying glass to display the results. ![]()
Click on "Reset filters" to delete the search criteria. ![]()
From the search results, it is possible to export the results in a format that can be used by a spreadsheet program (e.g. Excel, LibreOffice Calc, ...). ![]()
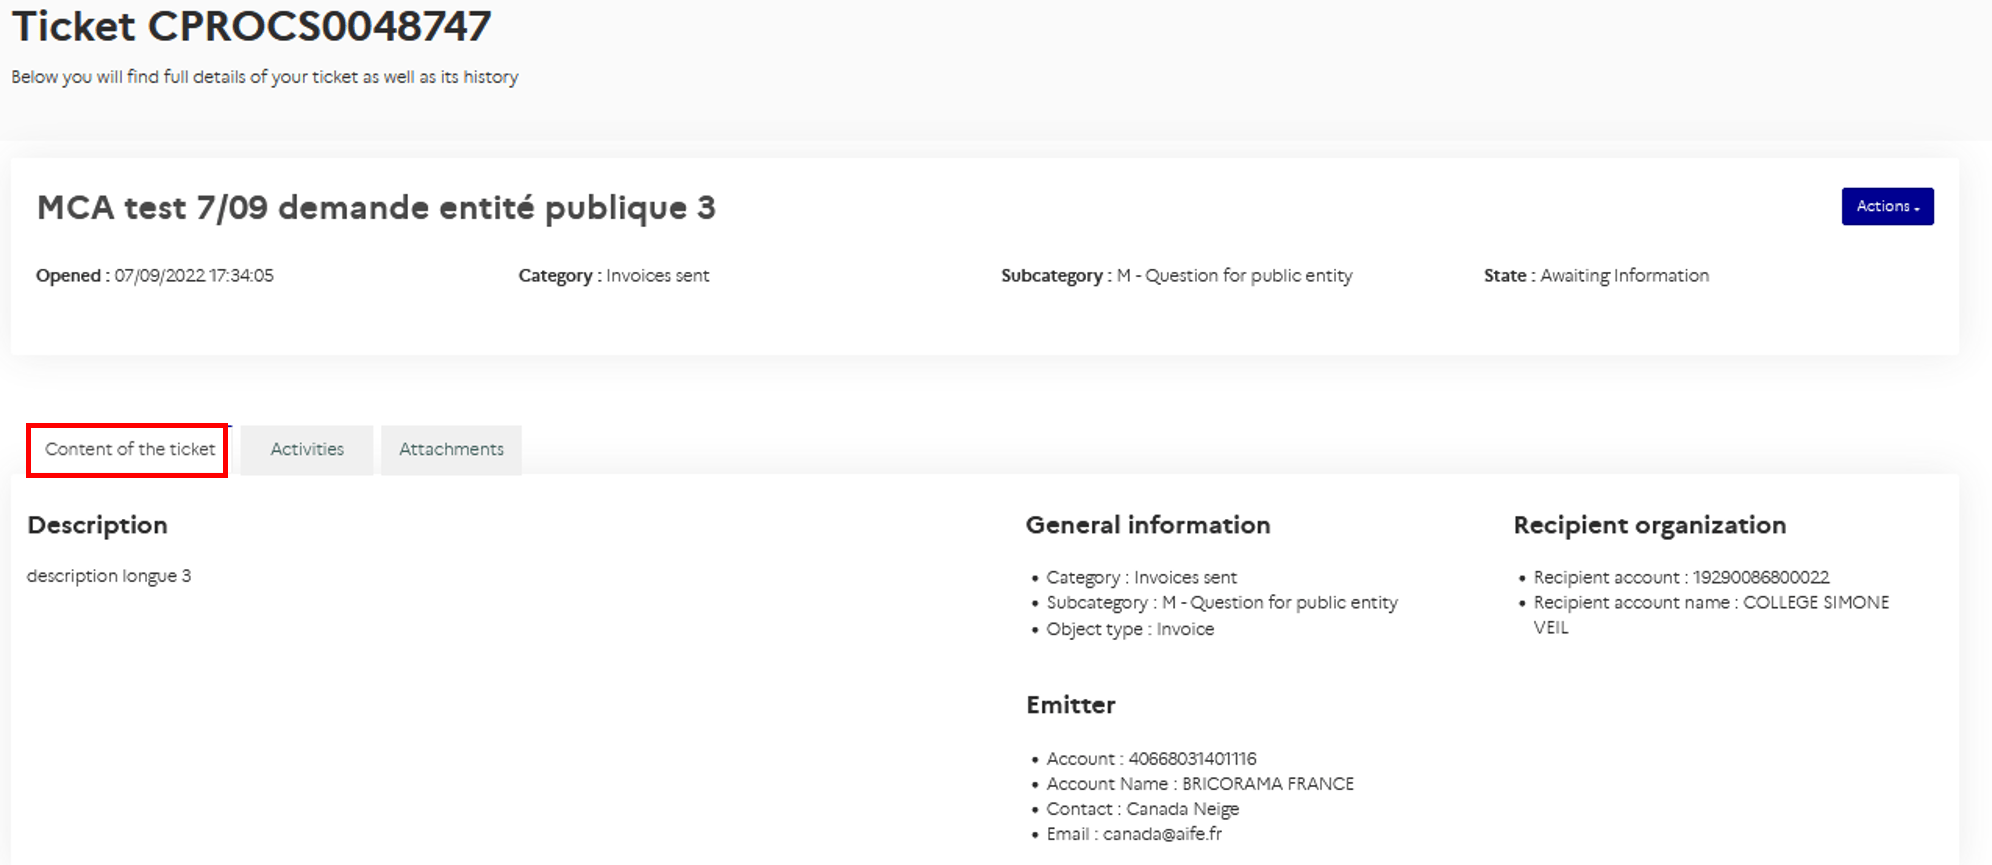
To view the details of the request for assistance, click on the ticket number displayed in the table.
It allows you to obtain:
General information about the ticket:
- Date of creation
- Category and sub-category
- Status
- Type of object and object number (if it is a business help request)
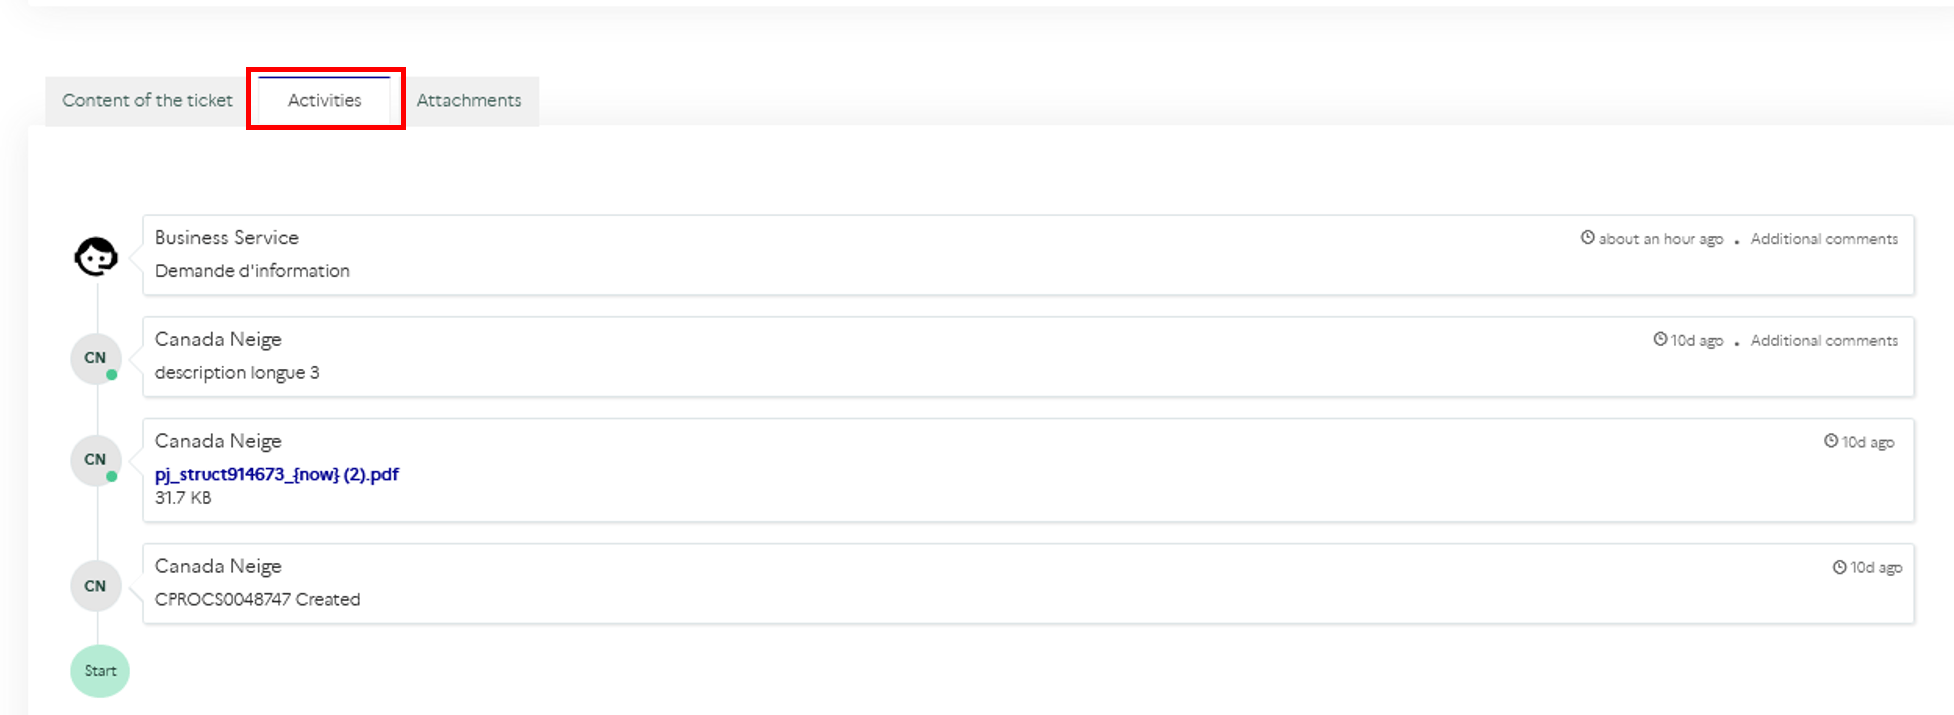
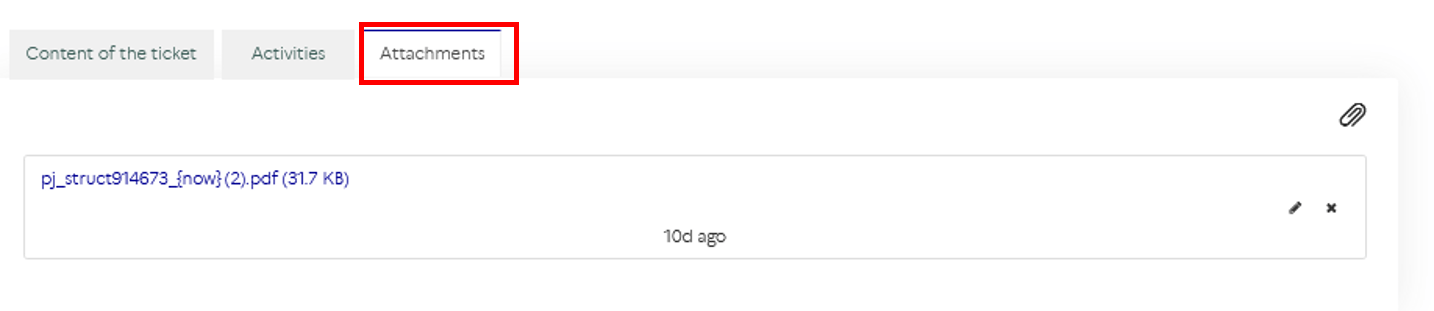
The content of the ticket
- The description of the request for help.
- Information about the issuing organization.
- The information of the recipient organization (if it is a request for help to the trade).
- The history of the ticket's activities.
- The response or request for additional information entered by the recipient of the request.
- Attachments added by the sender and, if applicable, by the receiver.
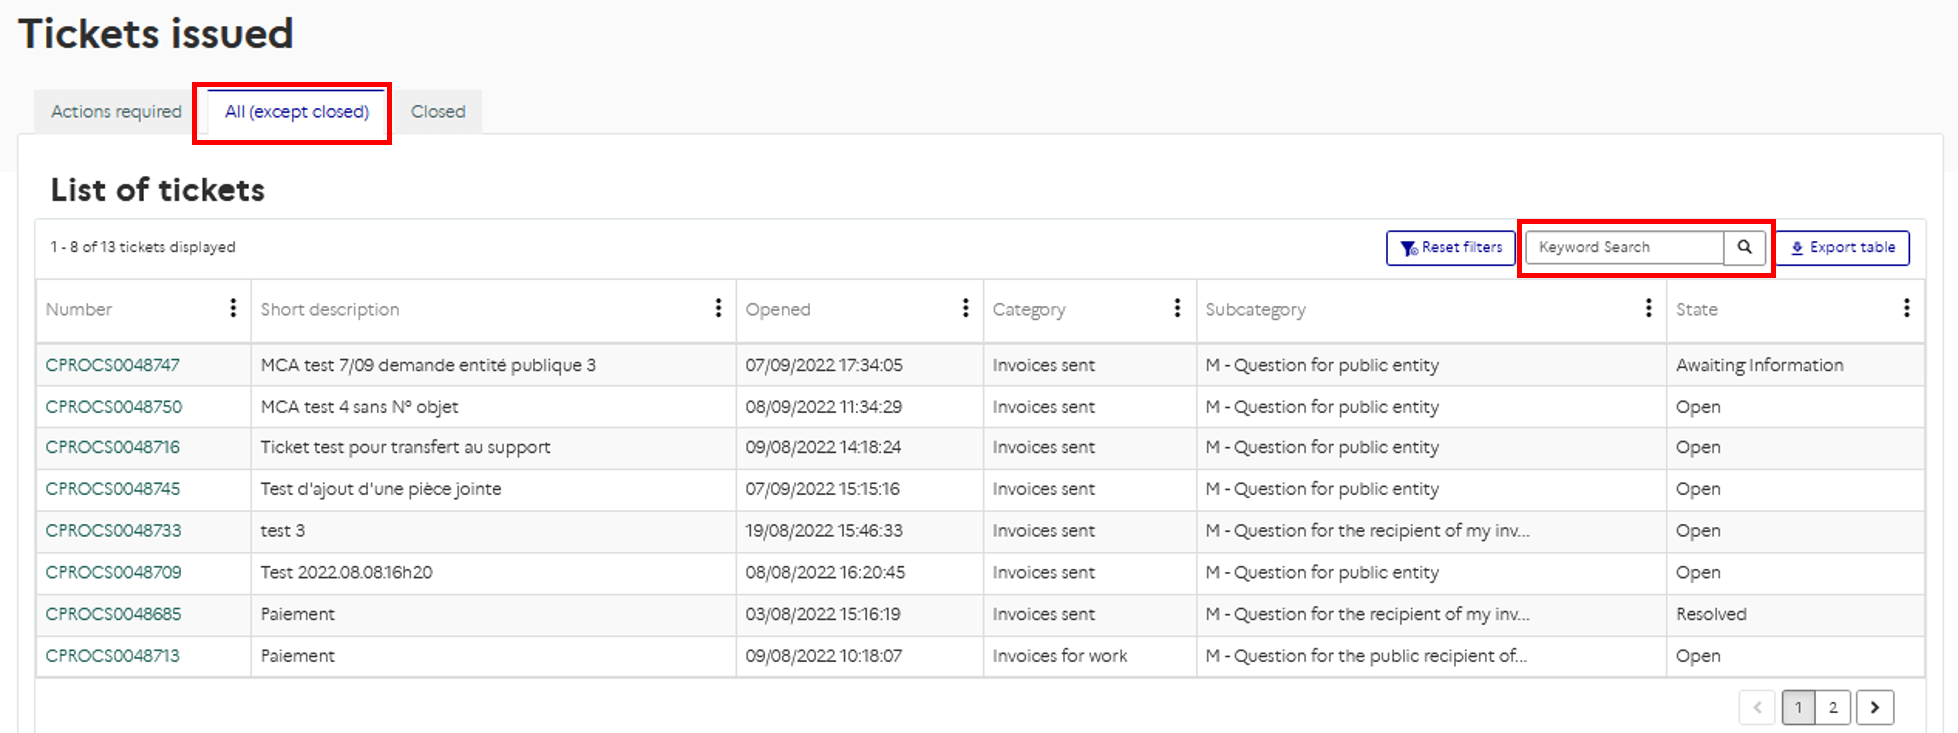
The tab "All (except closed)" gives access to all the tickets issued, for all the structures to which the user is attached.
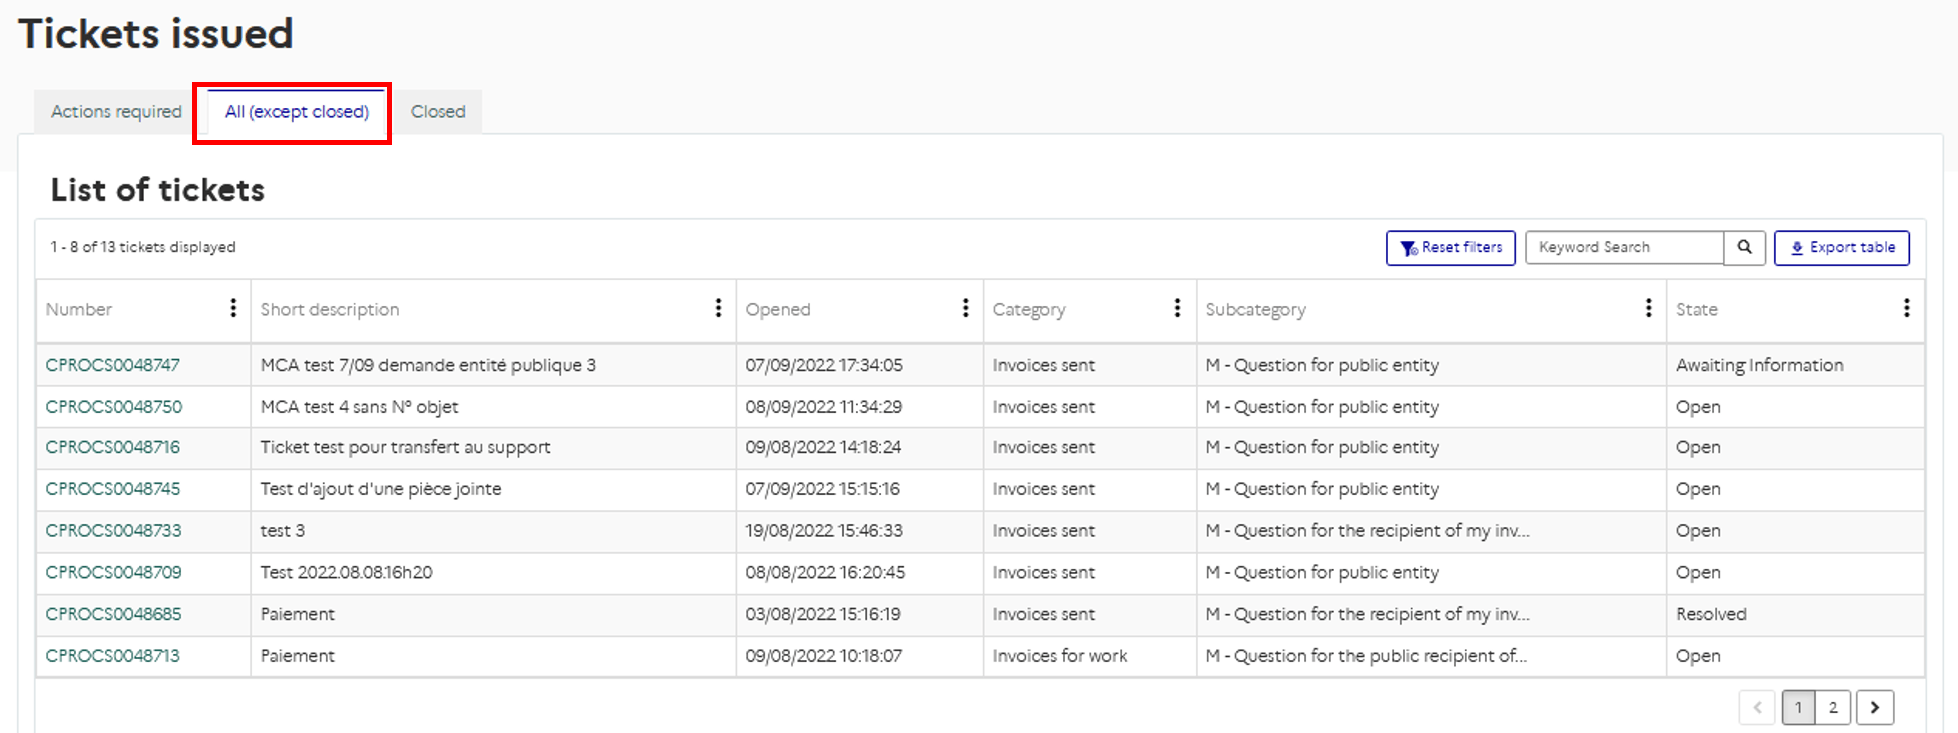
The "All (except closed)" tab allows you to view all the tickets (or requests for help) issued according to their status.
The statuses returned are: "Open", "Waiting for information", "Solved".
Only tickets with the status "Closed" are not displayed. To find them, you must consult the "Closed" tab.
By clicking on the columns "Number", "Short description", "Category", "Subcategory" and "Status", it is possible to group and classify the tickets issued in alphabetical order or in reverse alphabetical order. The issued tickets can also be sorted by date of creation by clicking on the "Created" column.
The "Closed" tab allows you to find all the tickets issued in "Closed" status.

An issued ticket changes to "Closed" status in two cases:
- If the issuer has manually closed the ticket by clicking on "Action" and then "Close Ticket" to indicate that they no longer need support to respond to their request for help.
 - If the issuer has clicked on "Accept Solution" that has been offered.

As illustrated in session 1.2, i.e. in connected mode, it is now possible to set tickets being created to "Draft" status. As a result, you have the possibility to come back to a ticket later to edit and submit it or even delete it. For example, to delete a ticket, you will need to click on the "Drafts" tab as shown in the following figure:
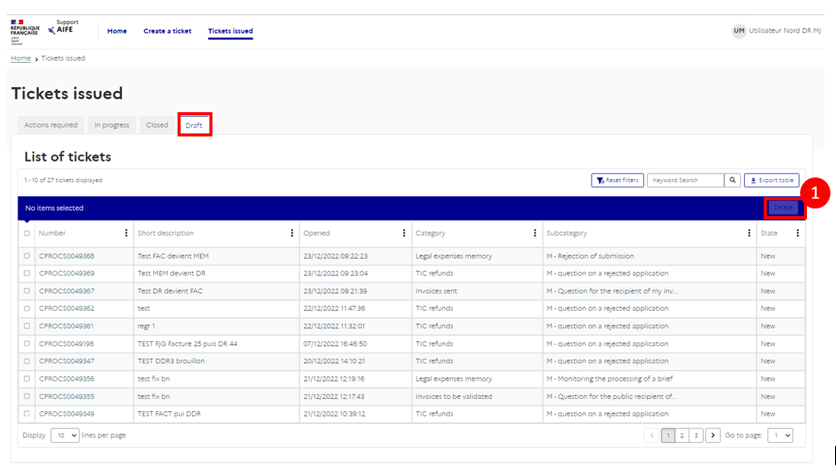
Once on the "Drafts" tab, the "delete" button (1) is grayed out by default. It is grayed out as soon as a ticket is selected as in this picture:

When the line corresponding to the ticket you want to delete is selected, click on the button (1) "Delete" and you will see a confirmation window for deleting the selected ticket:

To finalize the delete of the ticket, click the "Delete Draft" button and you will see the ticket disappear from your ticket list interface in draft status.
PROCESS A TICKET
When the recipient of the request for assistance considers that it does not have all the elements necessary to process it, it may request additional information from the issuer.
In this case, the ticket appears in the status "Waiting for information" in the "Actions required" tab.
After clicking on the ticket number, the details are displayed on the screen.
The question asked by the recipient appears in the "Activities" tab of the ticket.
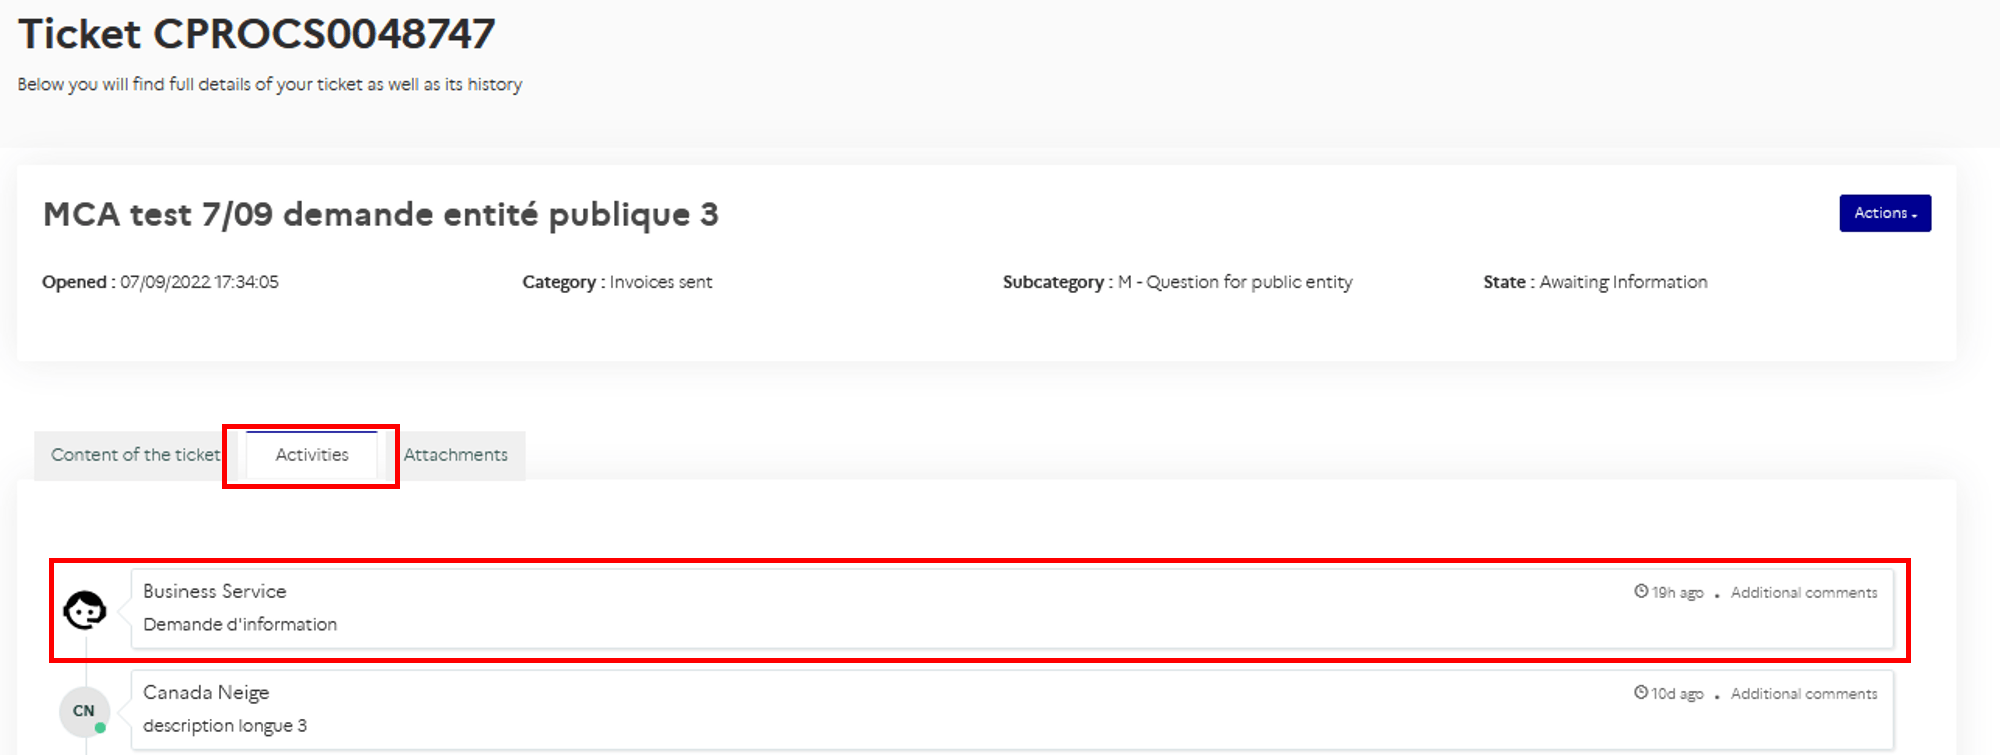
To reply and provide the additional information requested by the recipient structure, click on the "Actions" button and then "Reply to request".

Note: this button is only available to the sender when the ticket is in "Awaiting information" status.
A "Reply to request" window will then appear:
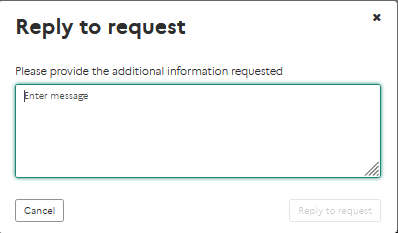
Your response is displayed in the ticket's activity stream.
Add/remove attachments if needed in the "Attachments" tab.
Tickets for which the recipient has provided a response are changed to "Resolved" status.
They appear in the list of tickets to be processed in the "Actions required" tab.
To see the answer, click on the ticket number; the information can be found in the "Activities" tab.
The ticket must then be closed to close it permanently if the answer provided by the recipient solved the problem, or sent back to the recipient if the answer is not appropriate.
If the response from the recipient is not appropriate:
- Click on the ticket number in the "Actions required" tab.
- Select the "Actions" button.
- Click on "Reject Solution".

- Fill in the reason in the window that appears on the screen.

- Click on "Reject solution".
The ticket is then sent back to the recipient and changes back to "Open" status.
If the answer is appropriate, you must accept the solution, which will close the ticket.
To close a ticket, it must be in "Resolved" status.
- Click on the ticket number in the "Required Actions" tab.
- Select the "Actions" button.
- Click on "Accept Solution".

The ticket will then change its status to "Closed". It is no longer visible in the "Actions required" tab and will appear in the "Closed" tab of "Tickets issued".
Note: It is possible to close a ticket in "Open" status before the receiver responds when the question asked is no longer relevant.

The ticket will then change its status to "Closed" and will be moved to the "Closed" tab of "Tickets issued".

Last Update: January 12, 2023