

This page is intended for understanding the management of users on the Chorus Pro service portal.
In the portal, two kinds of users are identified :
- The main manager : the person responsible for the structure. The creator of the structure is by default the 'Main Manager'. The role of a manager is to connect users to his structure, to validate the connection requests, to detach users when they do not work any more within a structure, among others.
- Users : Users are people who have created an account on Chorus Pro and who do not have the status of main manager. They are attached to the structure for which they work. They will have all modification and/or consultation rights, safe the right to modify the organization (and therefore the structure).
It is therefore important for the main manager to adjust the rights of the new users he/she authorizes to the real needs of the structure. For example, he can withdraw the right to accept new attachments to his structure in order to keep control over the attachment requests.
Manage users' connection
Any person who wishes to enter, submit or process an invoice on the Chorus Pro service portal must be connected to the structure or structures that employ him/her. The main manager of each structure is then responsible for the links to his/her structure and verifies, by validating the connection requests, that the people he/she validates are indeed working within his/her structure.
Connect a user to a structure
To connect a user to a structure, click on the "Organisation" area from the Chorus Pro Portal home page.
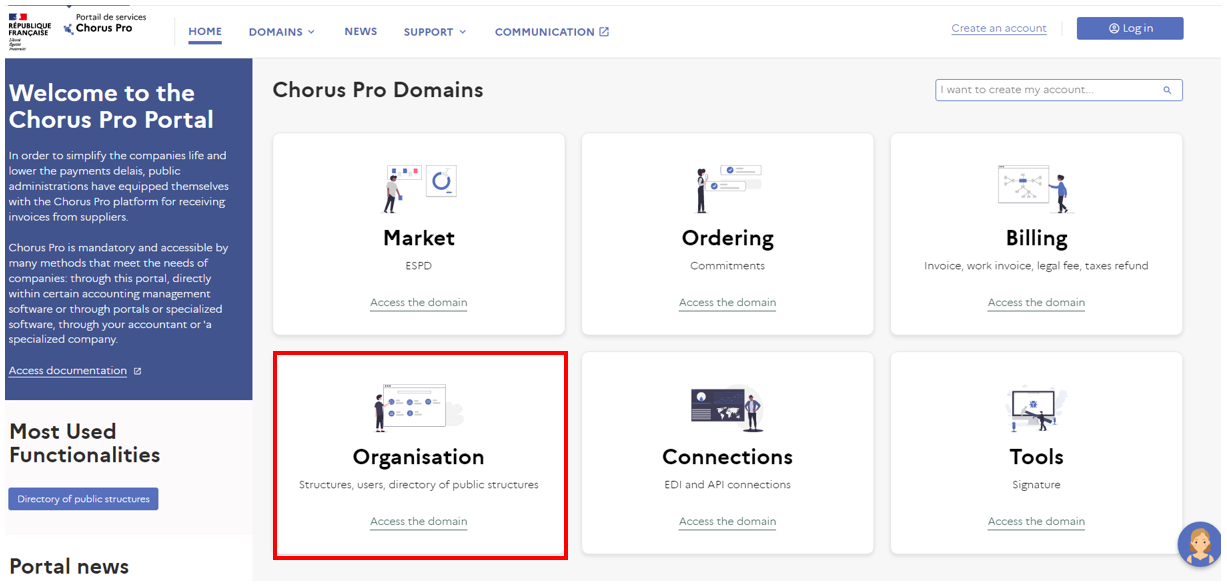
This will take you to the applications and domains screen of the "Organisation" domain. Then click on the "Users" area.

Once you have clicked on the "Users" area you will be taken to the user management screen and, as the main manager, you will be able to connect a user who belongs to your structure from the "Connect a user" application.

Once you have clicked on the "Connect a user" application, you will arrive on the "General information" screen. You will then be able to enter the email address of the user to be connected and the structure to which you wish to connect him/her if you have several structures.
Finally, you will have to choose the level of connection you want for this user. There are 2 levels of connection : The « structure » service level and the « service » service level.
The « structure » service level will allow you to connect the user only to your structure. The « service » service level will allow you to go to an additional level by choosing a particular service within the structure.
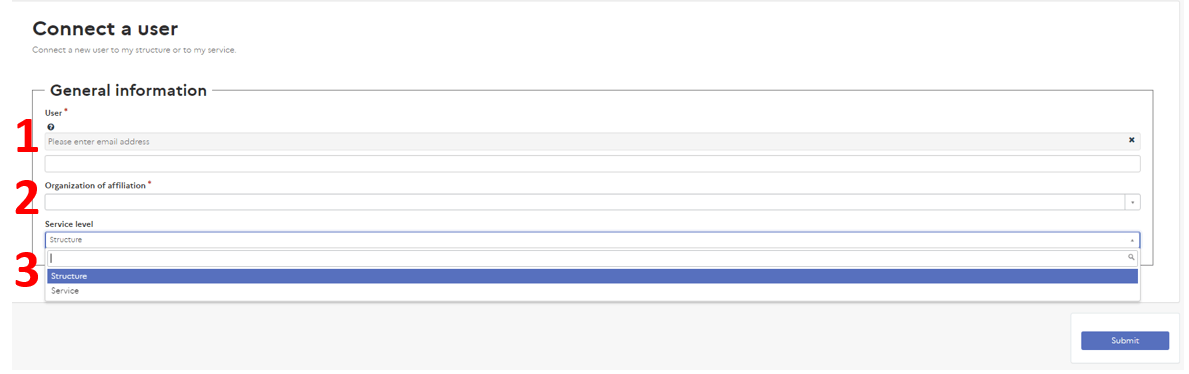
Then validate the connection by clicking on the "Submit" button at the bottom right of the screen.
Detach a user from a structure
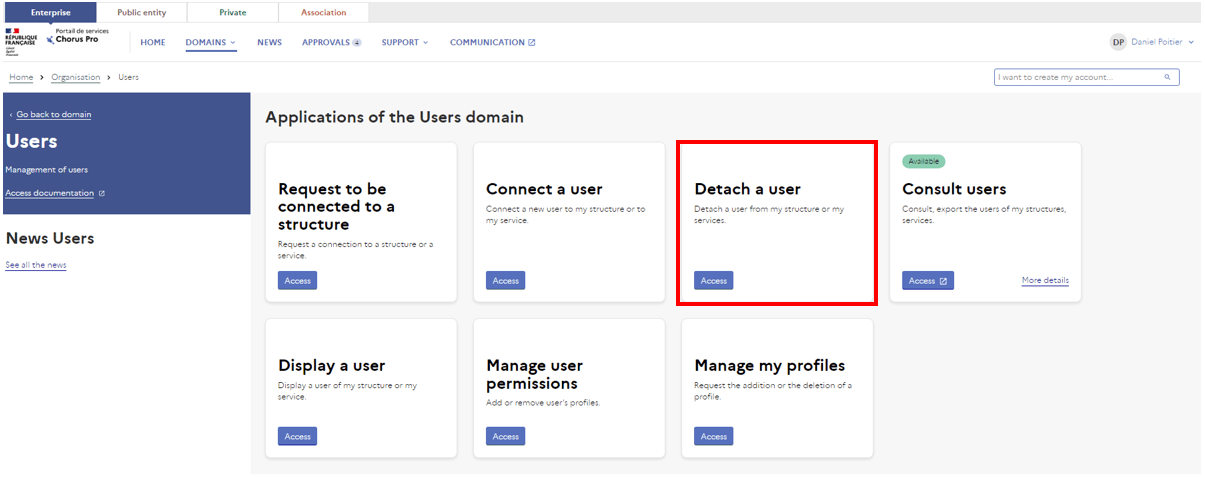
A user connected to your structure can be detached from it as soon as he/she no longer works there and cannot deposit or process invoices. To detach a user, you shall proceed by the same way as to connect a user (Home > Organisation > Users). Once you are on the user management screen, you must click on the "Detach a user" feature to perform the detachment operation.
Once you are on the "Detach a user" screen, you can choose the structure from which you want to detach the user, the name of the user to be detached, a comment to explain the reasons for the detachment and finally the level of detachment desired (« structure » service level or « service» service level).
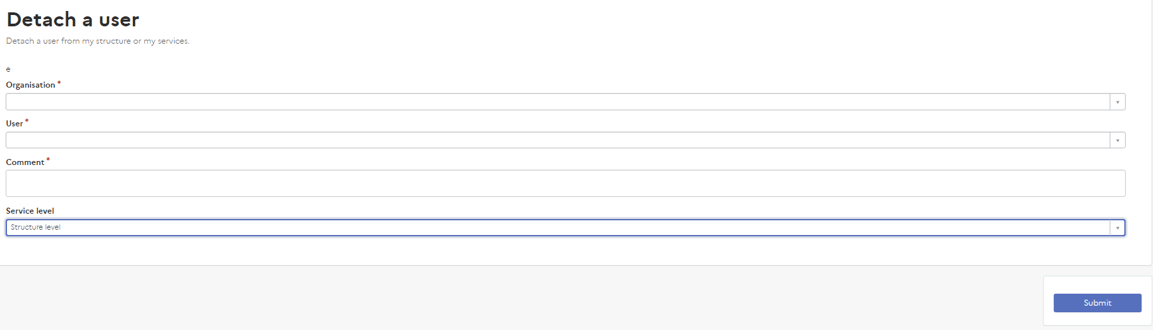
Then validate the detachment by clicking on the "Submit" button at the bottom right of the screen. This user will no longer have access to this structure and/or service.
Request to be connected to a structure / service
All users can request a connection to a structure in which they work.
To request a connection, please go to the "Organisation" domain, then the "Users" domain and the "Request to be connected to a structure" application.
You will then be able to choose the type of organisation (structure or service), the type of identifier of your structure, the type of structure, the name of your structure and enter a comment to explain your request.

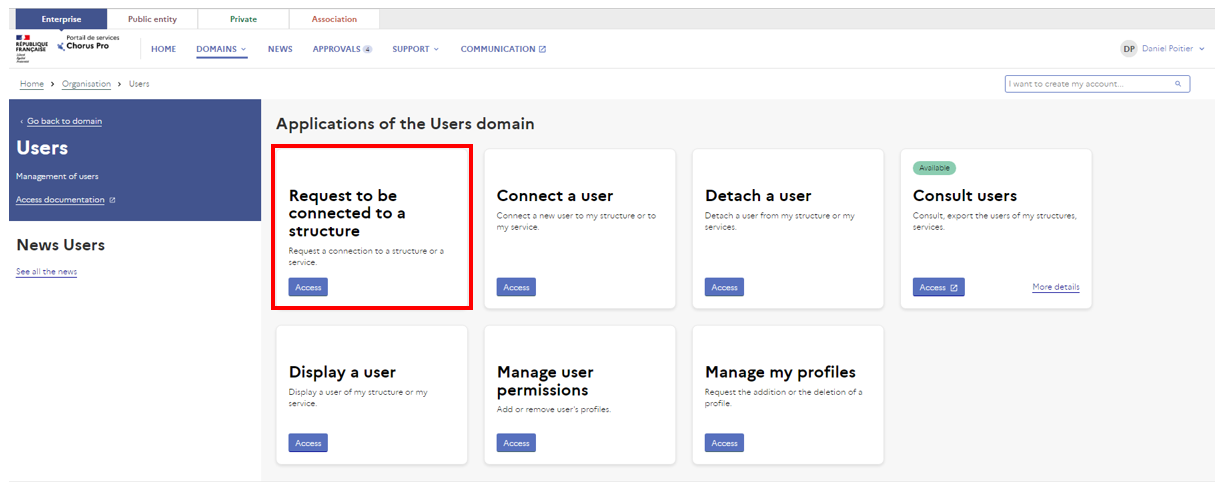
Display a user
You can view the list of users in your facility from the "Display a user" application in the "Users" area.
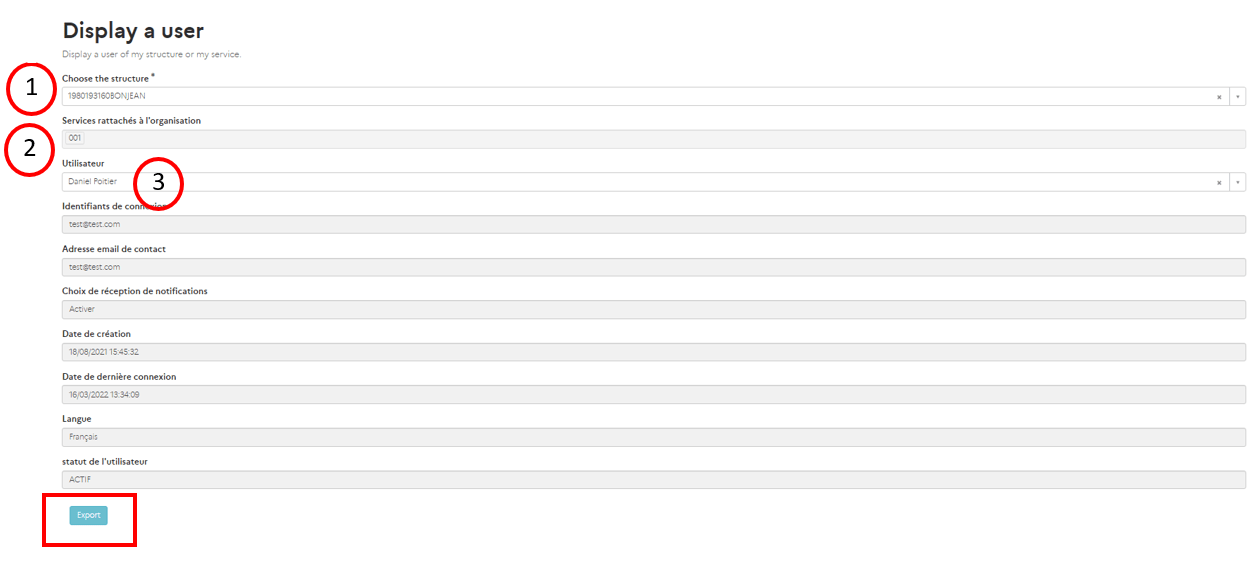
Once you get to the "Display User" screen, you can choose the structure (1) you want to view if you have more than one. Then you can choose the service (2) and finally you can search for users (3) from the user search bar.
After finding the user you are looking for and clicking on the corresponding name, you will have access to a list of information about this user that you can export in CVS format, using the "Export" button.
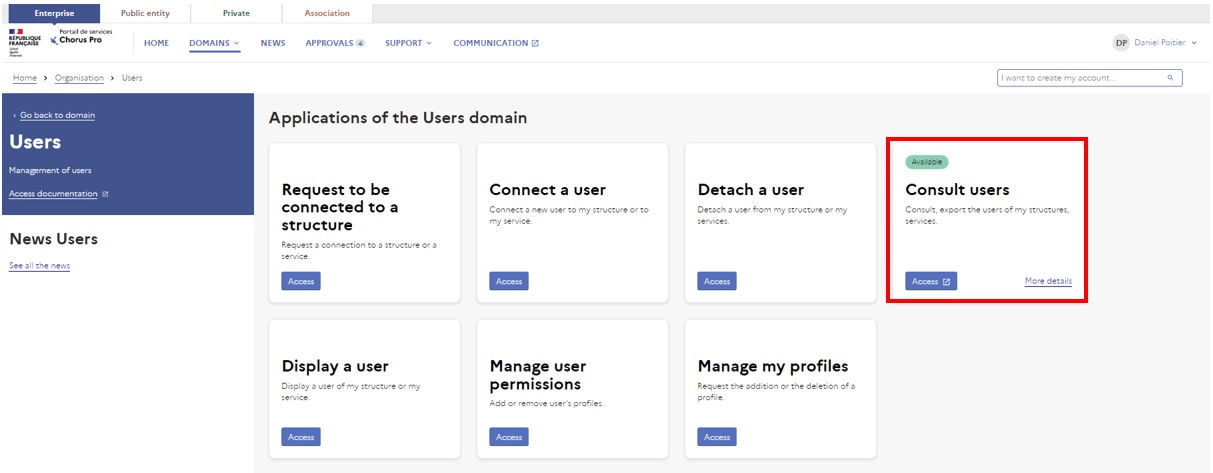
Consult users
From the "Consult users" application, you can obtain a list of all the users listed in your organisation.
To access your contacts, in the "Organisation" domain, then the "Users" domain, click on the "Consult Users" application.
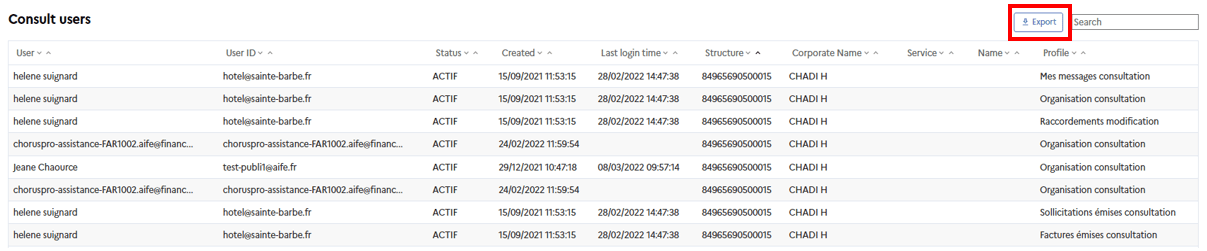
You will then arrive on the "Consul users" screen with the list of users of your structure with different columns that you will find below. This list can be exported in XLS format using the "Export" button.
Manage approvals
An approval is a validation from the main manager for user requests.
Approvals are required for :
- Modifications of authorizations
- Requests to be connected to a structure / department
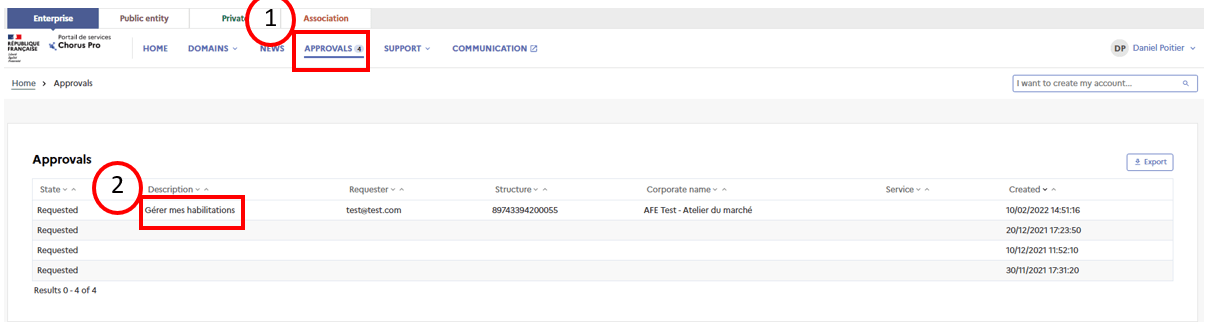
To access, click on "Approvals" (1) on the menu bar of the home page. The number next to it indicates the number of pending approvals.
The list of pending approvals is displayed. For each approval, information about the status, description, requester, structure, department and date of request is displayed.
To access an approval, click on the description name (2).
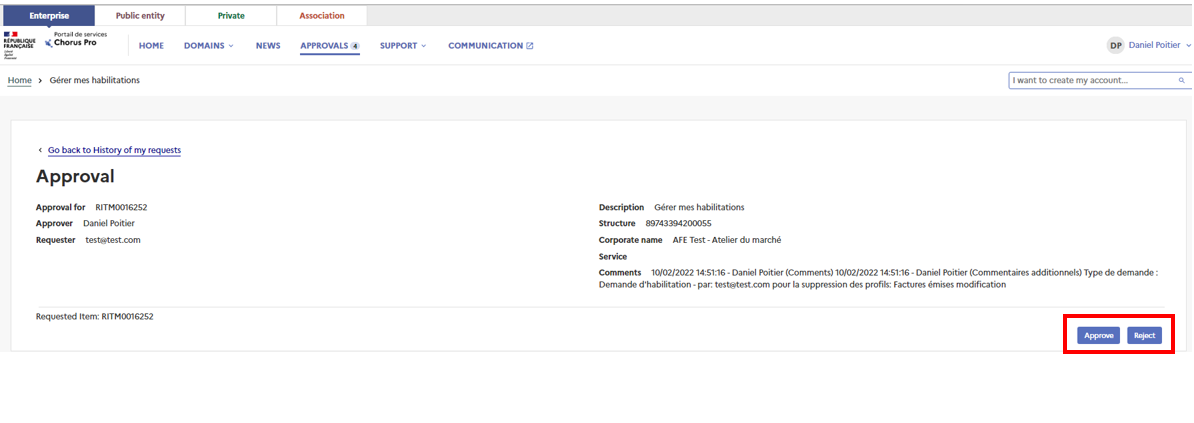
The selected approval opens. The previously available information is repeated and the information about the approver (yourself) as well as the comment of the request is displayed.
Click on the buttons at the bottom of the page to approve or deny the request. Approval will be immediate and you will be redirected to the list of approvals.
In case of refusal, a window will appear to explain your refusal. You can then refuse.

Last Update: March 16, 2022