PREREQUIS A LA SAISIE SUR LE PORTAIL
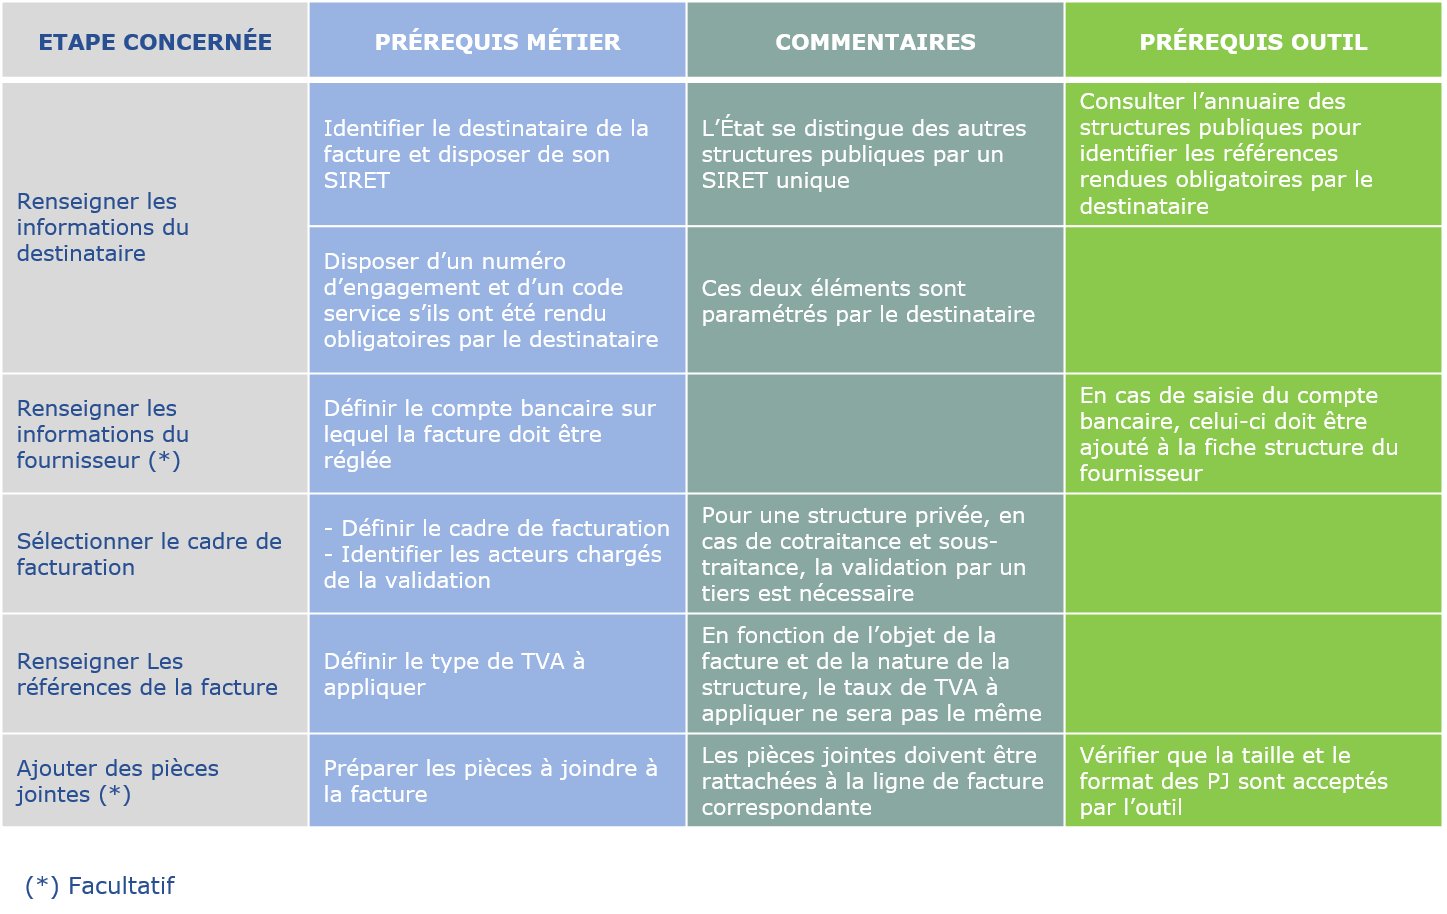
Le mandat de facturation autorise Chorus Pro à générer des factures sur la base des éléments que vous indiquez (ex : montants, destinataires, références, etc.) lorsque vous optez pour la saisie de facture (création de la facture directement sur le portail de services Chorus Pro) plutôt que le dépôt de factures (dépôt d’une facture créée en dehors du portail de services).
Il s’agit donc d’un prérequis obligatoire à la saisie de factures directement sur Chorus Pro pour les fournisseurs privés. En revanche, il n’est pas nécessaire en cas de dépôt sur le Portail ou d’envoi par flux.
Le contrat de mandat est signé directement en ligne.
Comment souscrire un mandat de facturation sur Chorus Pro ? (uniquement pour les entités privées)
Dans le domaine « Facturation », cliquez sur l’application « Souscrire un mandat de facturation ».
Dans le bloc Informations générales, sélectionnez votre structure et indiquez le nom du mandat. Les informations sur l’adresse postale et le signataire sont reprises en automatique.
Cliquez en bas de page sur « Soumettre ». Votre mandat est signé immédiatement, vous pouvez commencer à saisir une facture.

SAISIR UNE FACTURE SUR CHORUS PRO - PARTIE I
Cliquez sur le domaine "Facturation" puis sur l'application "Factures émises". Sélectionnez l'onglet "Saisir facture".
La saisie d’une facture dans Chorus Pro suit le cheminement suivant :
Le destinataire
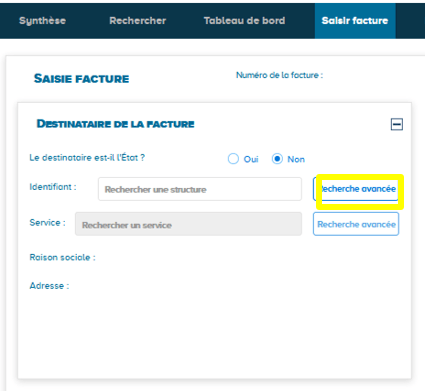
- Préciser si le destinataire est l’État.
- Si non, vous pouvez taper directement le numéro SIRET ou cliquez sur « Recherche avancée » et sélectionnez le destinataire à partir de son SIRET, de son nom, de sa ville ou de son code postal
- Vérifier dans l’annuaire des destinataires si la saisie du code service est obligatoire.
Recherche du destinataire :
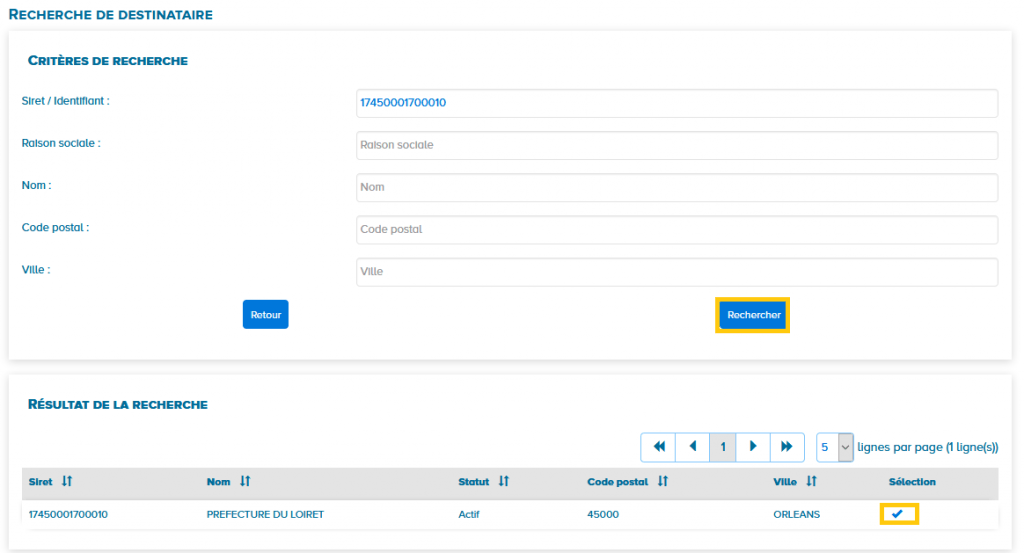
- Sélectionner la structure en cliquant sur la coche de sélection. Seule une structure au statut « Actif » peut être facturée.
- Les champs « Raison sociale » et « adresse » sont remplis automatiquement à partir des informations du SIRET destinataire.
– L’État se caractérise par une structure unique, dont le SIRET est le 11000201100044.
– Les factures soumises à l’État doivent nécessairement mentionner une référence d’engagement et un service exécutant.
– Les structures privées n’ont pas le droit de saisir des factures sur le service FACTURES_PUBLIQUES (réservé à la facturation intra-sphère publique).
Le fournisseur

- Sélectionnez la désignation :
Le menu déroulant propose l’ensemble des structures auxquelles le compte utilisateur est rattaché. Il s’agit de la structure au nom de laquelle la facture est émise.
- Sélectionnez le service :
Le menu déroulant contient l’ensemble des services paramétrés sur la structure. Il s’agit d’une information facultative.
- L’identifiant, l’adresse, le pays et le numéro RCS :
Sont remplis automatiquement à partir de la fiche structure.
- Sélectionnez les références bancaires* :
Le menu déroulant liste les comptes bancaires enregistrés sur la fiche structure. Une référence bancaire doit être sélectionnée si le compte bancaire de l’utilisateur est différent de celui communiqué dans le marché. Si vous faites appel à une société d’affacturage, sélectionnez alors ses coordonnées bancaires.
Le cadre de facturation permet d’identifier le document déposé ainsi que l'acteur en charge du dépôt. Cette information est renseignée pour chaque pièce transmise.

‒ A1 : Un fournisseur ou un mandataire dépose une facture à régler ou un avoir (dans Chorus Pro, la saisie d’un avoir est identique à celle d’une demande de remboursement. Seul le type de facture les distingue).
‒ A2 : Un fournisseur ou un mandataire dépose une facture déjà payée. Ce cadre permet de transmettre à un destinataire public une facture ou un avoir ne donnant pas lieu à une opération financière ou comptable (liquidation, création de titre, opération de trésorerie, décaissement, reversement, etc.).
Toute facture, avoir, solde d’acompte ou de régularisation dont le montant à payer est nul peut donc être transmis avec ce cadre de facturation.
‒ A9 : Un sous-traitant dépose une facture à régler ou un avoir
‒ A12 : Un cotraitant dépose une facture à régler ou un avoir
Des cadres de facturation spécifiques sont également prévus pour les factures dans le cadre des marchés de travaux, des mémoires de frais de justice, et des demandes de remboursement de la Taxe Intérieure sur les Carburants (TIC).

Renseignez :
- La devise (par défaut, la valeur est en euros).
- le type facture (Facture ou Avoir).
- Le type de TVA :
- Si vous êtes assujettis à la TVA :
- TVA sur les encaissements : cette TVA est sélectionnée par défaut.
- TVA sur les débits : à sélectionner uniquement dans le cas où vous avez effectué une démarche auprès des services fiscaux pour être en TVA débits.
- Exonéré : si vous êtes exonérés, précisez le motif d’exonération grâce au menu déroulant.
- Si vous n’êtes pas assujettis à la TVA :
- Sans TVA.
- Si vous êtes assujettis à la TVA :
Puis, renseignez :
- Le numéro du marché/contrat (facultatif) ;
- Le numéro d'engagement (obligatoire si demandé par la structure publique) ;
- En cas d'avoir, le numéro de la facture d'origine (facultatif) ;
- Le mode de règlement : par défaut, la valeur est "Virement". En cas de report d’un avoir sur la prochaine facture, sélectionner le mode de paiement "Report".
Si vous sélectionnez exonéré de T.V.A, toutes les lignes de postes ou de prestations de TVA seront automatiquement nulles.
Cliquez sur "Enregistrer" :
![]()
Attention : A cette étape, la facture n’est pas encore envoyée; elle passe au statut « Brouillon » et peut être modifiée ultérieurement.
5 nouvelles rubriques apparaissent :
- Ligne de facture
- Récapitulatif TVA
- Commentaire
- Montants totaux
- Pièces-jointes
Chacune de ces rubriques est détaillée dans la section suivante.
SAISIR UNE FACTURE SUR CHORUS PRO - PARTIE II
![]() Cliquez sur Ajouter une ligne de facture.
Cliquez sur Ajouter une ligne de facture.
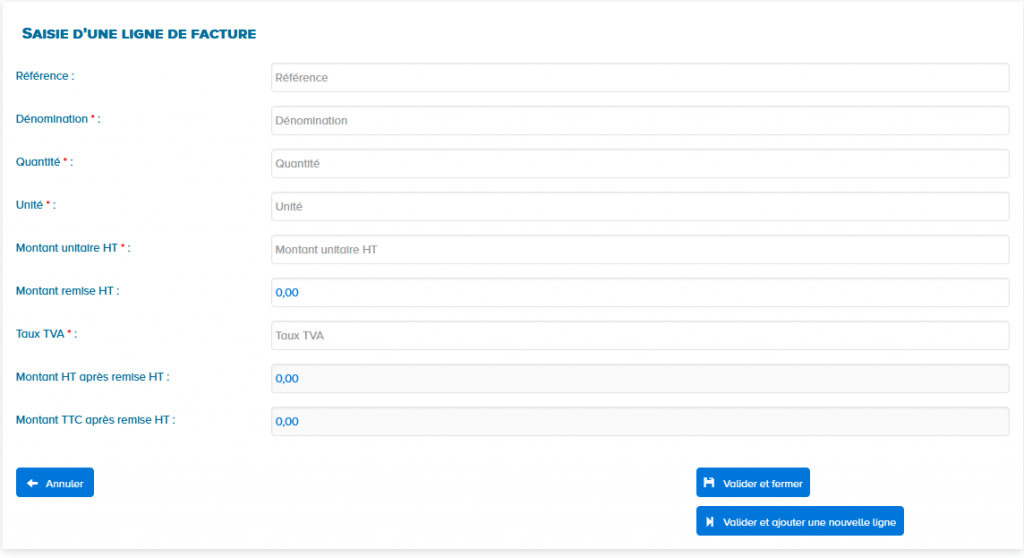
Puis renseignez les informations de la facture :
- Référence : code de l'article de la fourniture (zone informative et facultative).
- Dénomination : nom de l'article de la fourniture.
- Quantité : nombre d'unités facturées.
- Unité : unité utilisée pour la livraison.
- Montant unitaire HT : prix unitaire (HT) avant remise par unité de livraison .
- Montant remise HT : en cas de remise, le montant à déduire de la facture peut être saisi soit HT au niveau de la ligne de facture, soit TTC au niveau de la rubrique Montant Total de la facture.
- Taux de TVA :à indiquer par l'émetteur de la facture.
- Le Montant HT après remise HT est calculé automatiquement selon la formule : [ ( Quantité ) * (Montant unitaire HT) - (Montant remise HT) ]* (1 + Taux TVA)
- Le Montant TTC après remise HT est calculé automatiquement en appliquant la TVA sur le montant après remise HT.
Cliquez sur Valider et fermer ou Valider et ajouter une nouvelle ligne.
Une fois les lignes créées, le tableau ci-dessous se met à jour : Pour chaque ligne de facture, il est alors possible de :
![]() L'éditer ;
L'éditer ;![]() La dupliquer (les pièces jointes associées à la ligne ne sont pas dupliquées) ;
La dupliquer (les pièces jointes associées à la ligne ne sont pas dupliquées) ;![]() Ajouter des pièces jointes à une ligne de factures en particulier (si la pièce jointe ne concerne pas une ligne de facture spécifique alors elle sera ajoutée à la facture dans le bloc dédié Pièces jointes, voir Partie 8) ;
Ajouter des pièces jointes à une ligne de factures en particulier (si la pièce jointe ne concerne pas une ligne de facture spécifique alors elle sera ajoutée à la facture dans le bloc dédié Pièces jointes, voir Partie 8) ;![]() La supprimer.
La supprimer.![]() L'utilisateur peut supprimer toutes les lignes dont les cases de sélection sont cochées, cela supprimera aussi les pièces jointes associées.
L'utilisateur peut supprimer toutes les lignes dont les cases de sélection sont cochées, cela supprimera aussi les pièces jointes associées.
Dans le bloc Récapitulatif TVA, les données du tableau sont calculées automatiquement à partir des informations saisies dans les lignes de facture et une ligne par taux de TVA s'affiche.
 Dans le bloc Montant totaux, les montants HT, de TVA et TTC avant remise sont calculés automatiquement à partir des informations saisies dans les lignes de facture.
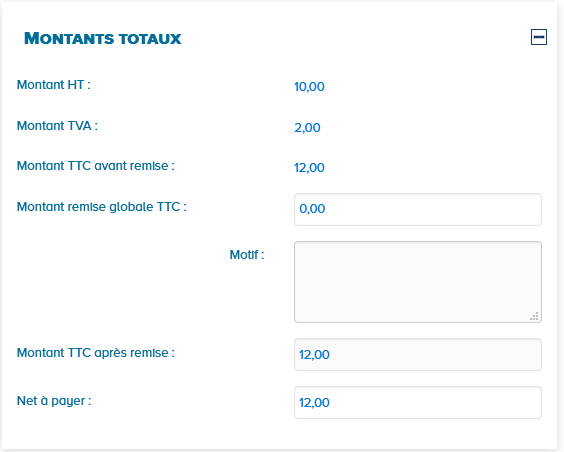
- En cas de remise, saisir le montant de la remise TTC et un motif.
- Le montant TTC après remise est également calculé automatiquement à partir du montant TTC avant remise et du montant de la remise.
- Le net à payer est pré-rempli automatiquement mais reste modifiable.
Si vous avez sélectionné exonéré de T.V.A ou sans T.V.A les lignes du tableau récapitulatif de TVA et les montants totaux sont mis à jour automatiquement.
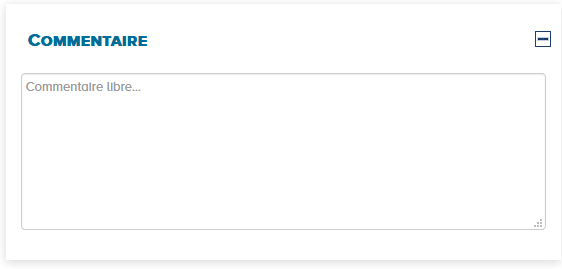
Cette rubrique permet de saisir, si besoin, un commentaire libre, afin de :
- Donner plus de précisions sur les spécificités propres à sa facture ;
- Compléter sa saisie avec des informations complémentaires ne rentrant pas dans les champs proposés.
Cliquez sur le bouton Ajouter une pièce jointe pour ajouter des pièces jointe le cas échéant. Répéter l’opération pour chaque pièce jointe.

Les pièces jointes courantes peuvent également être ajoutées depuis l’espace « Mon compte ». Cliquez sur le ![]() pour ajouter une pièce jointe à la facture.
pour ajouter une pièce jointe à la facture.
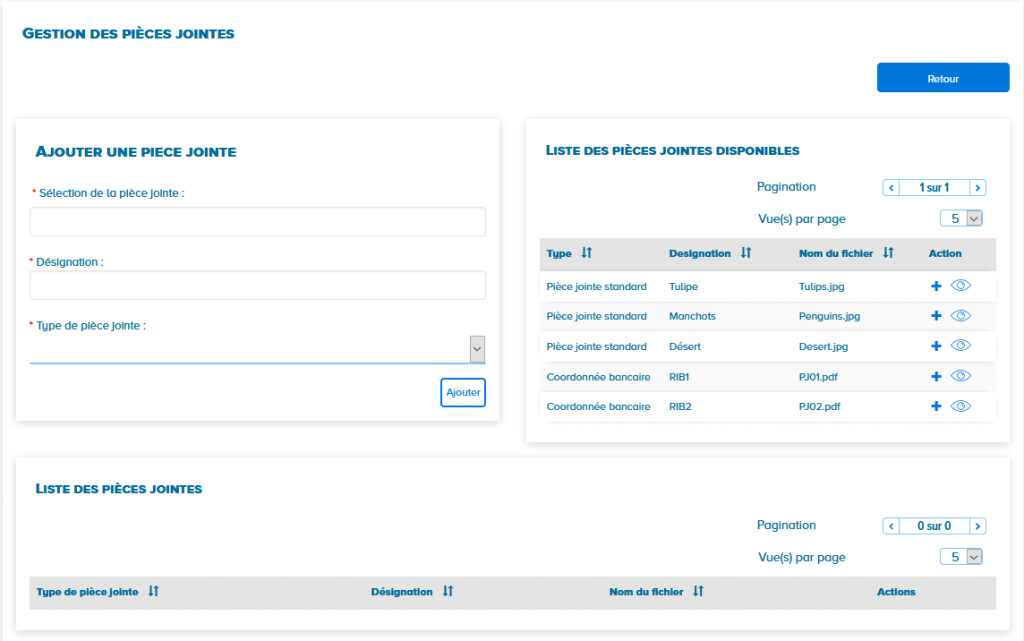
Dans la liste des pièces jointes enregistrées sur le compte, cliquez sur le bouton pour ajouter une pièce jointe à la facture.
- Cliquez sur Parcourir et sélectionner la pièce jointe sur votre ordinateur.
- Renseignez le champ Désignation avec le nom de la pièce jointe.
- Sélectionnez le type de pièce parmi ceux proposés dans la liste déroulante.
Cliquez sur le bouton Ajouter pour valider la saisie ou Retour pour poursuivre la saisie de la facture.
– Les extensions de fichier autorisées sont : BMP, HTM, FAX, PNG, XHTML, BZ2, JPEG, PPS, XLC, CSV, JPG, PPT, XML, DOC, ODP, RTF, XLS, GIF, ODS, SVG, XML, GZ, ODT, TGZ, GZIP, P7S, TIF, HTML, PDF, TXT, ZIP, TIFF, XLSX, DOCS. – La taille maximale autorisée d’une pièce jointe est de 4 Mo. Une fois de retour sur la facture, le bloc Pièces jointes est complété : 2. Il est également possible de :
Une fois l’ajout de pièce(s) jointe(s) effectué, plusieurs options s’offrent à vous :
![]()
- Cette action permet de saisir un nouvelle facture vierge
- Cette action permet de reprendre toutes informations saisies pour créer une nouvelle facture
- Cette action permet d’enregistrer la facture sans l’envoyer
- Cette action passe la facture au statut « Brouillon » et donne la possibilité de la modifier ultérieurement.
- Cette action permet d’envoyer la facture au destinataire. Toute modification est impossible.
Au moment de valider sa saisie, si certains champs obligatoires ne sont pas renseignés ou si les données renseignées sont erronées, un message indiquant le détail des erreurs s’affiche en rouge en haut de la page.
Les contrôles réalisés par Chorus Pro
Chorus Pro assure 3 niveaux de contrôle sur les données de facturation.
‒ Les contrôles de cohérence du flux et de sécurité : Pour chaque flux reçu, un contrôle antiviral et un contrôle sur les formats sont prévus tant pour les données de facturation originales que pour les pièces jointes.
‒ Les contrôles de structure des données : Pour chaque type de flux, les règles de syntaxe, cardinalité et format des données sont contrôlées en entrée de la solution.
‒ Les contrôles de la cohérence des données :

Si tous les champs nécessaires ont été renseignés, lorsque l'on clique sur Valider et Envoyer, la fenêtre ci-dessous s'affiche :
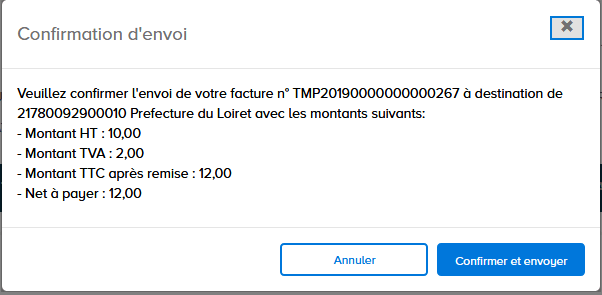
Cliquez sur Confirmer et envoyer pour soumettre la facture. La page de récapitulatif de la facture s'affiche :
Vous pouvez donner votre avis sur la qualité du service en ligne mis à disposition pour le dépôt de vos demandes en cliquant sur le bouton « Je donne mon avis » présent sur le récapitulatif.

L’utilisateur peut récupérer le numéro de facture (généré automatiquement par Chorus Pro) pour faciliter le suivi de sa facture par la suite.
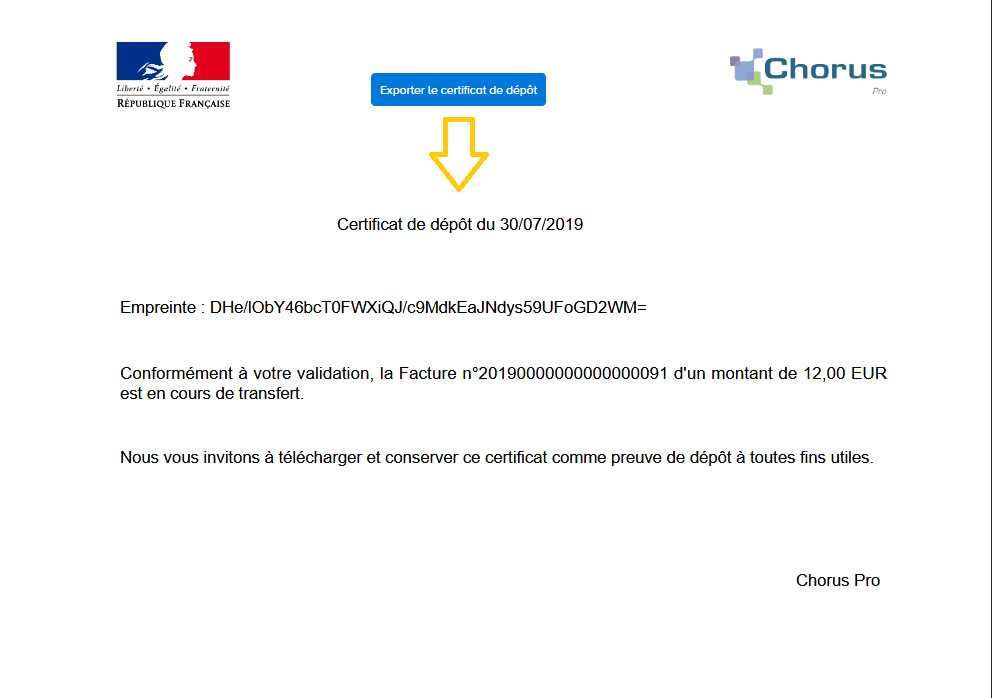
Option : Exporter le certificat
Le certificat de dépôt peut être utilisé comme preuve de l'envoi de la facture. Il récapitule le numéro de la facture ainsi que le montant net à payer.
INFORMATIONS COMPLEMENTAIRES
- Dans le cadre de l’exécution des contrats en cours, les factures des structures publiques émises à l'encontre d'une autre structure publique sont concernées par l’obligation de dématérialisation depuis le 1er janvier 2017.
- Pour les structures dont la comptabilité est suivie dans Hélios, la transmission des avis des sommes à payer s’appuie surL’envoi d’un flux PES Facture de Chorus Pro à HELIOS pour l’ensemble des documents émis à destination de la sphère publique.
– L’envoi d’un flux de Chorus Pro à HELIOS pour l’ensemble des documents émis à destination de la sphère publique.
– L’envoi dématérialisé par le comptable à Chorus Pro pour les documents adressés à des destinataires publics.
- Pour les services de l’État dont la comptabilité est suivie dans Chorus, les titres de perception seront directement transmis à Chorus Pro après prise en charge par le comptable.
- Pour les autres structures publiques, le choix du mode d’émission pourra se faire selon les mêmes modalités que pour le mode de réception.
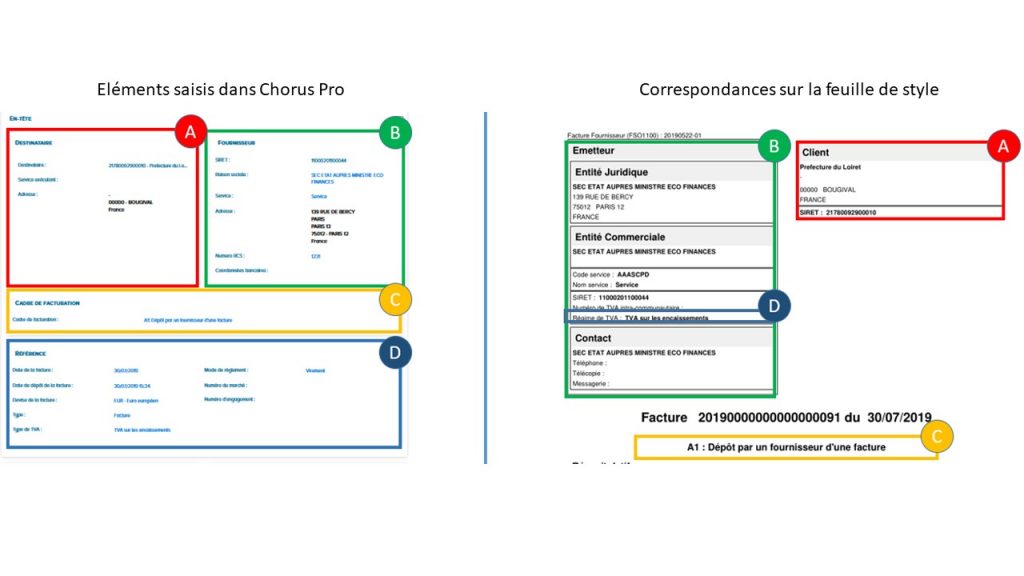
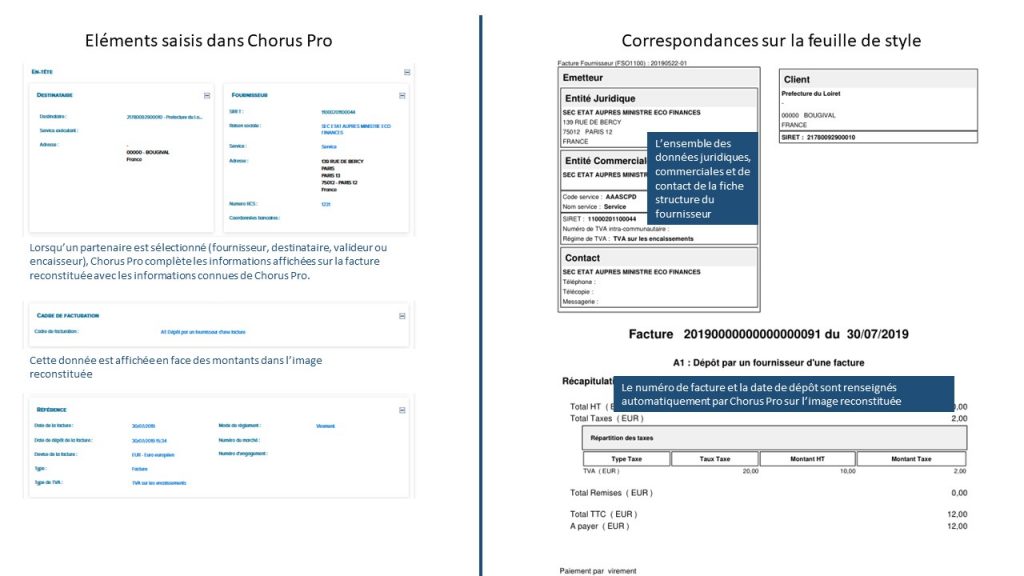
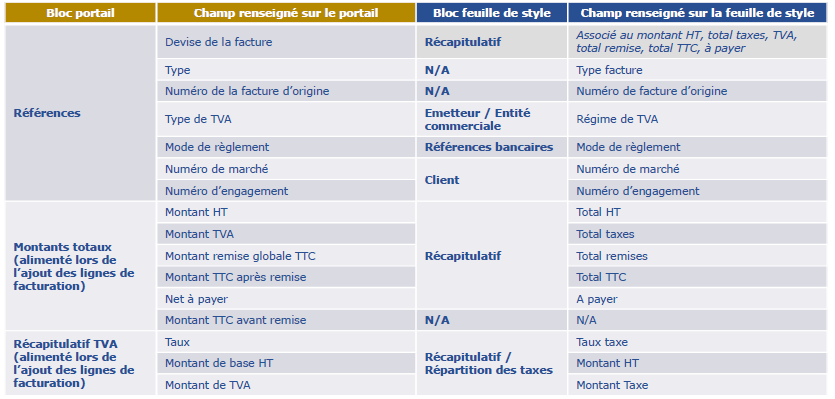
Correspondances entre le portail et la feuille de style
Emetteur et destinataire
Lignes de facturation et récapitulatifs des montants

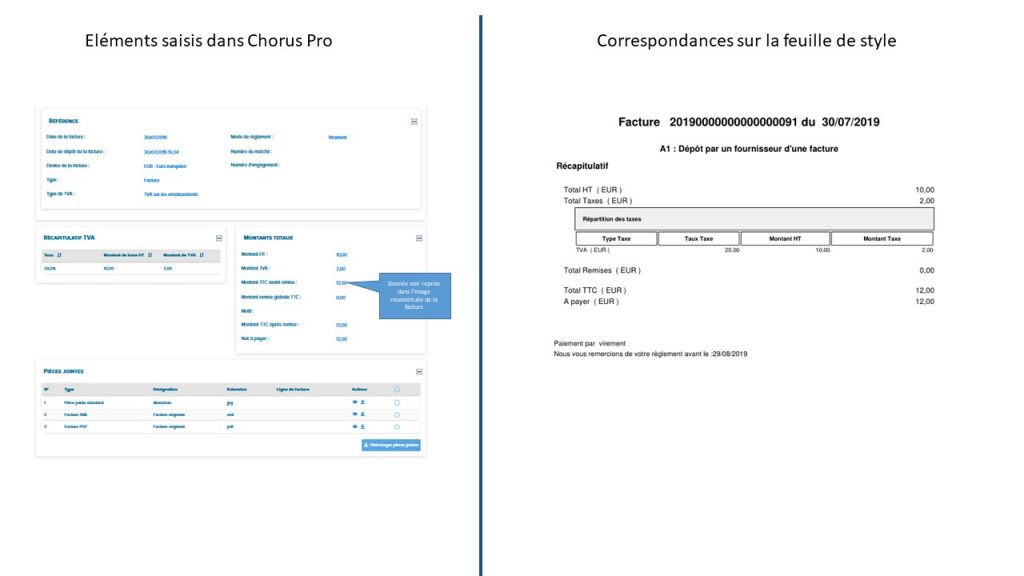
Tableau des correspondances (1/3)
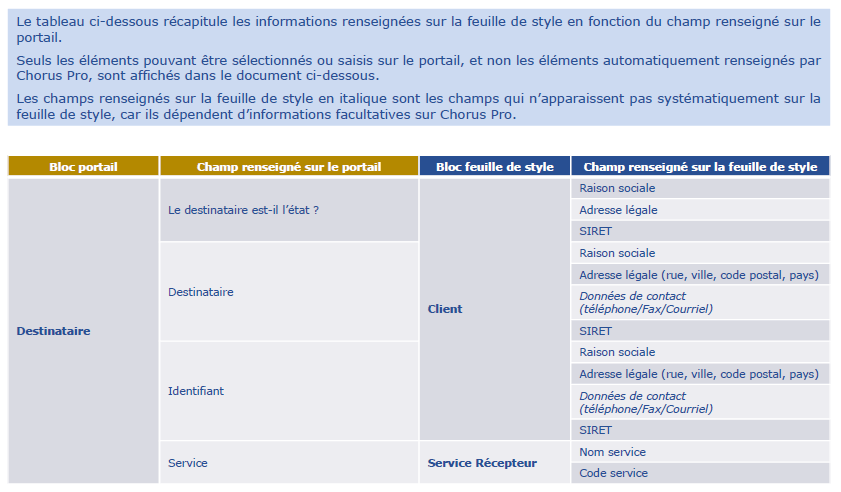
Tableau des correspondances (2/3)

Tableau des correspondances (3/3)
Tutoriel
Dernière mise à jour : mars 2, 2022


